Difference between revisions of "Create a task"
(→Share a task) |
(→Share a task) |
||
| Line 159: | Line 159: | ||
| − | * | + | *By default, the task is shared with its author, current responsible party, past responsible party and the people with whom the parent folders of the task are shared. Click on task in list view pane |
| + | |||
| + | [[File:F30.PNG|750px]] | ||
| + | |||
| + | |||
| + | *Click on “Shared with N people” to see all the team members with whom the task is shared.You can share a task with more team members. Choose as many names as you need from the drop-down menu. | ||
| + | |||
| + | |||
| + | [[File:F31.PNG|750px]] | ||
| + | |||
| + | |||
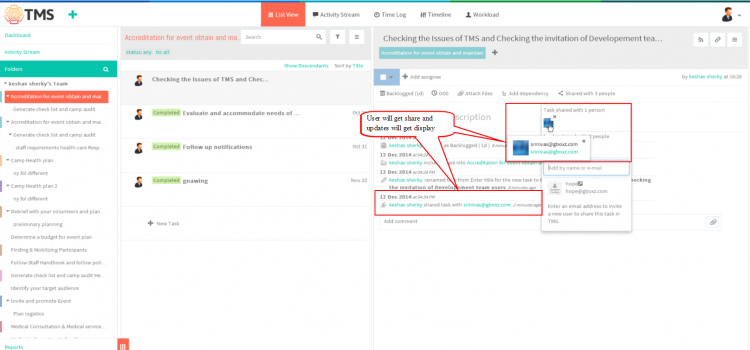
| + | *Shared user will get display when we click on the "share with N people", Appropriate task will get display to shared user | ||
| + | |||
| + | |||
| + | [[File:F32.PNG|750px]] | ||
| + | |||
| + | |||
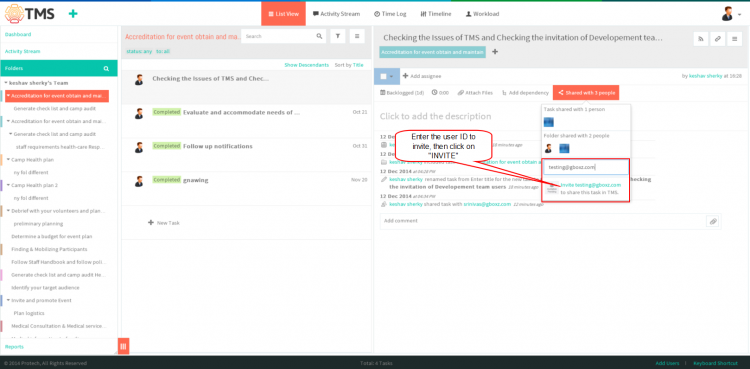
| + | *If the right name is not in the drop-down menu, you can invite that person to join TMS and grant him or her a license. enter the User mail id and then click on '''"Invite"''', appropriate user will get invitation mail, after accepting task will get display to the user | ||
| + | |||
| + | |||
| + | [[File:F33.PNG|750px]] | ||
==''' Follow a task''' == | ==''' Follow a task''' == | ||
Revision as of 06:18, 12 December 2014
| >> Back To TMS Help Center Main page | >> Tasks |
Contents
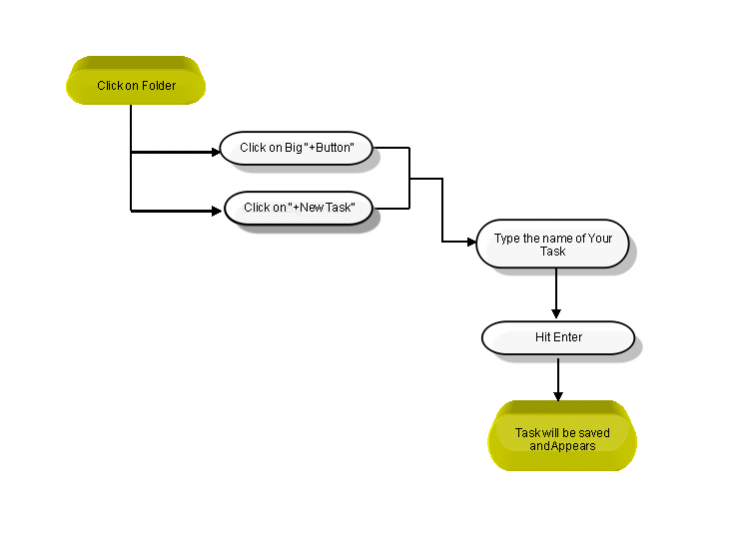
Follow the steps to Create a new task
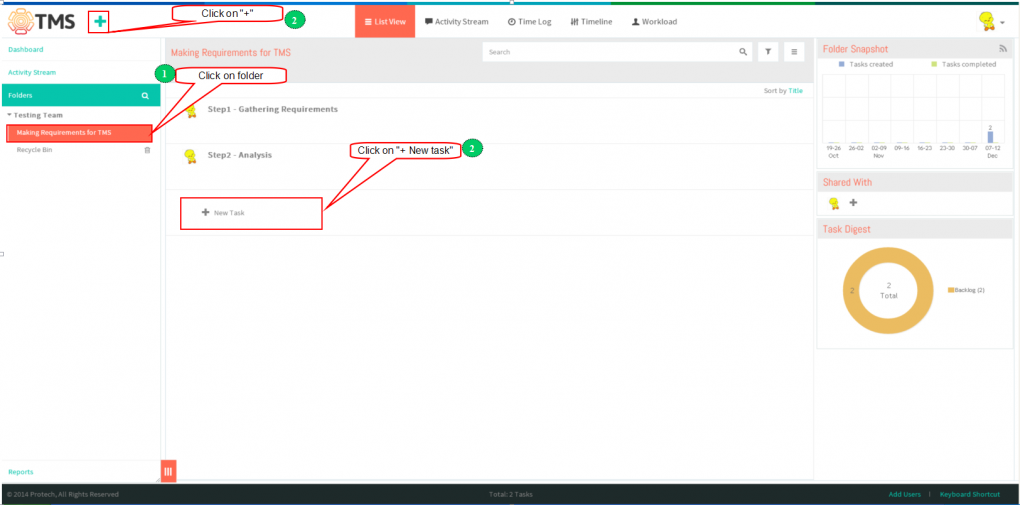
- In the left-hand pane, click on the folder in which you want to create a task
,Then simply click on the big “+” Button or “+ New Task” line in the task list pane
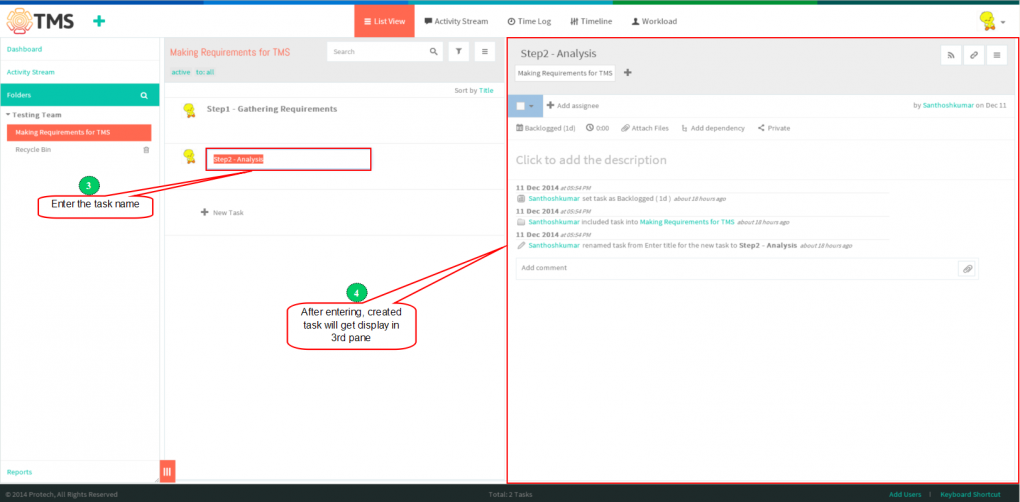
- Type in the name of your task,and hit “Enter”. task will get display in list view
. After this, the task will be saved and appear in the list in the middle pane of your workspace
.
Assign a task
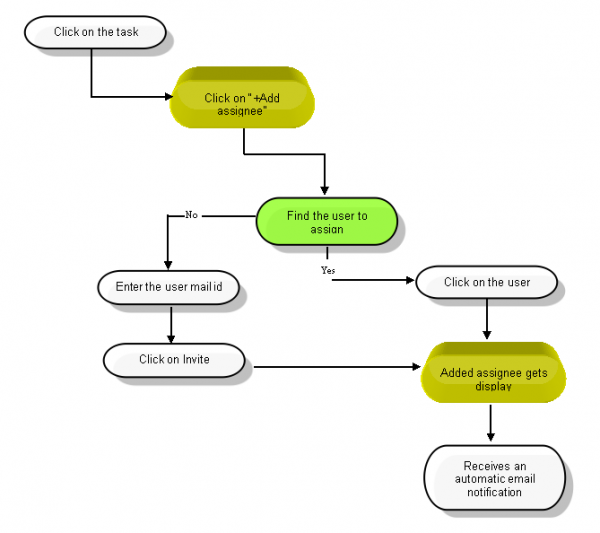
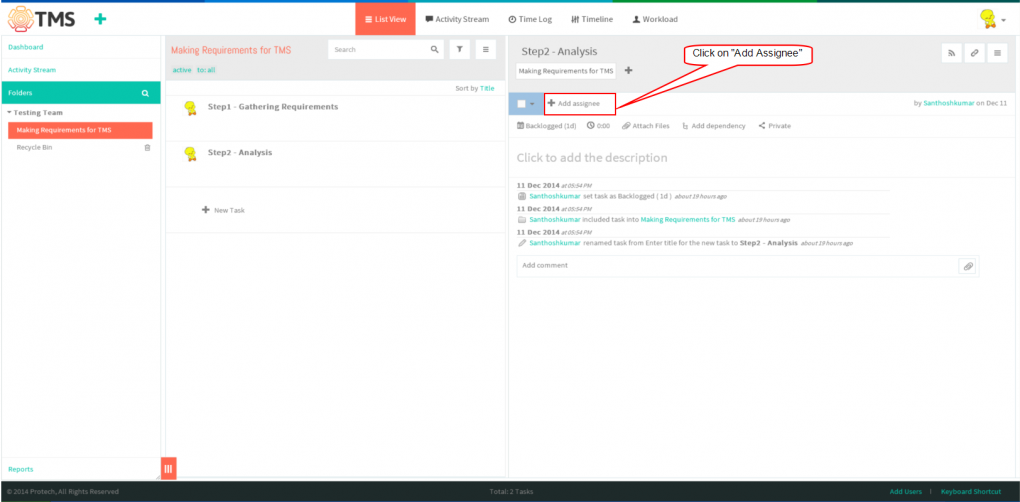
- Click on task in list view pane which is in left pane, then click on Add Assignee
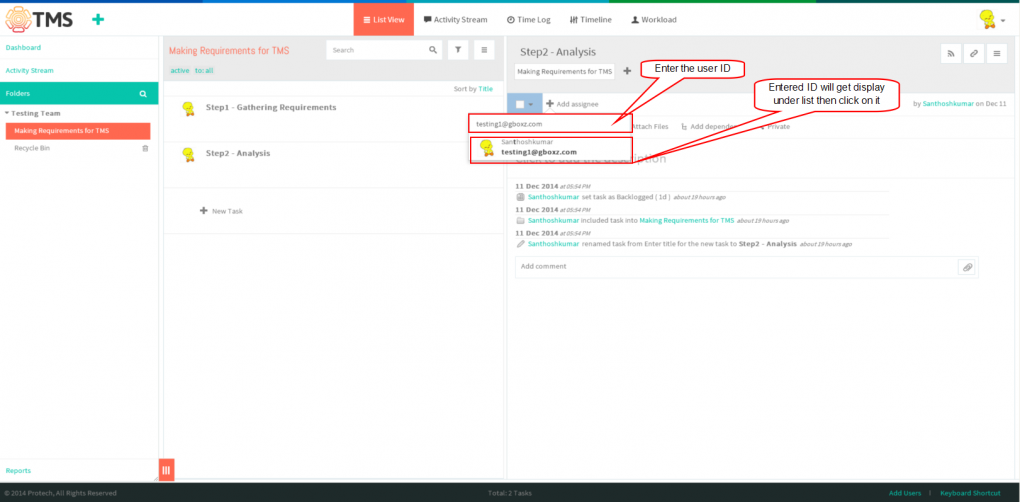
- You can type the first letters of the name, and TMS will suggest an appropriate list of people. You can assign the task to as many people as you need.
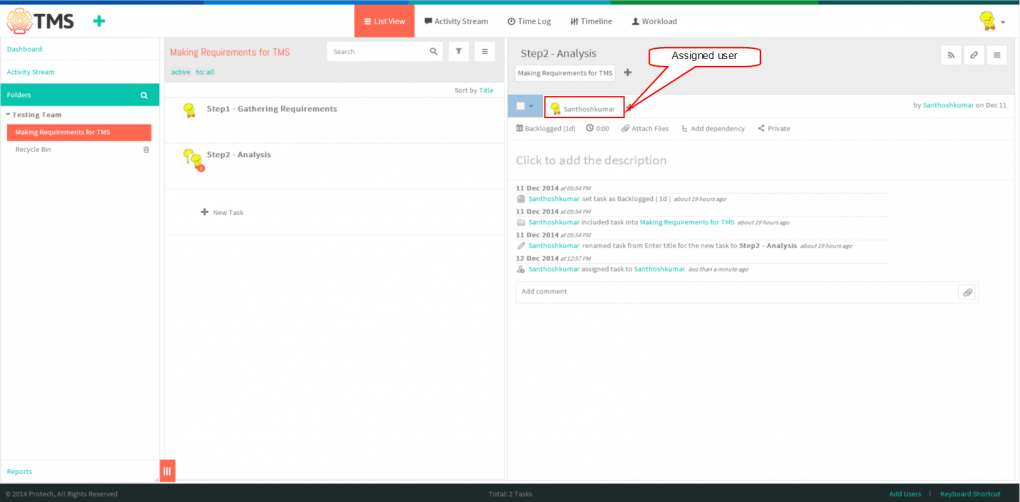
- Assigned user will get display
Schedule a task
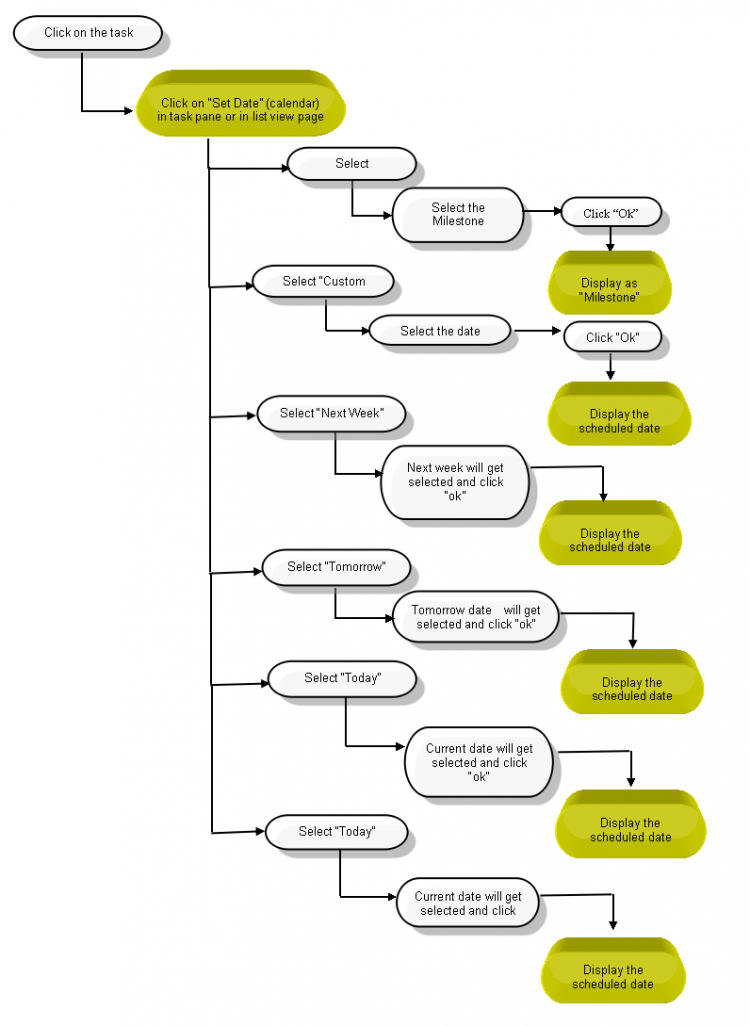
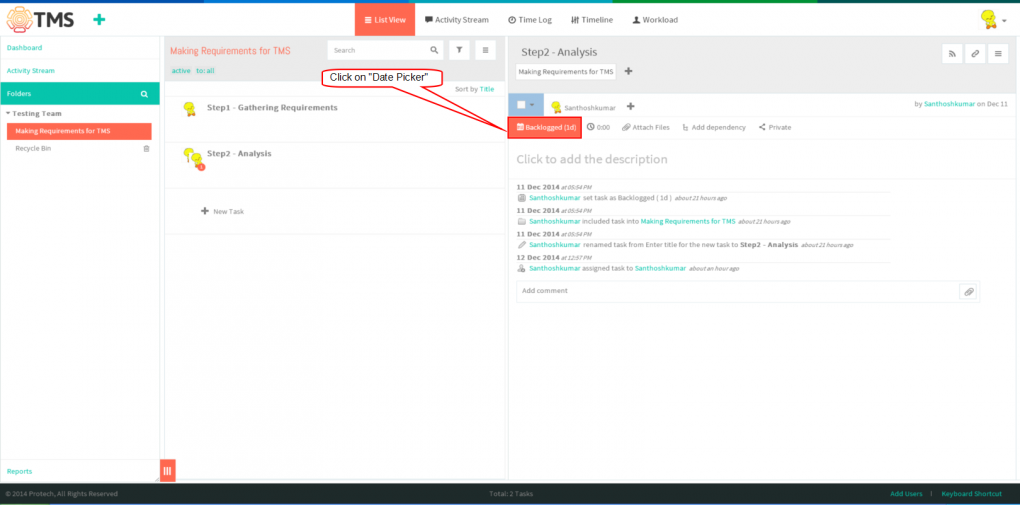
- Click on Date Picker to schedule the date
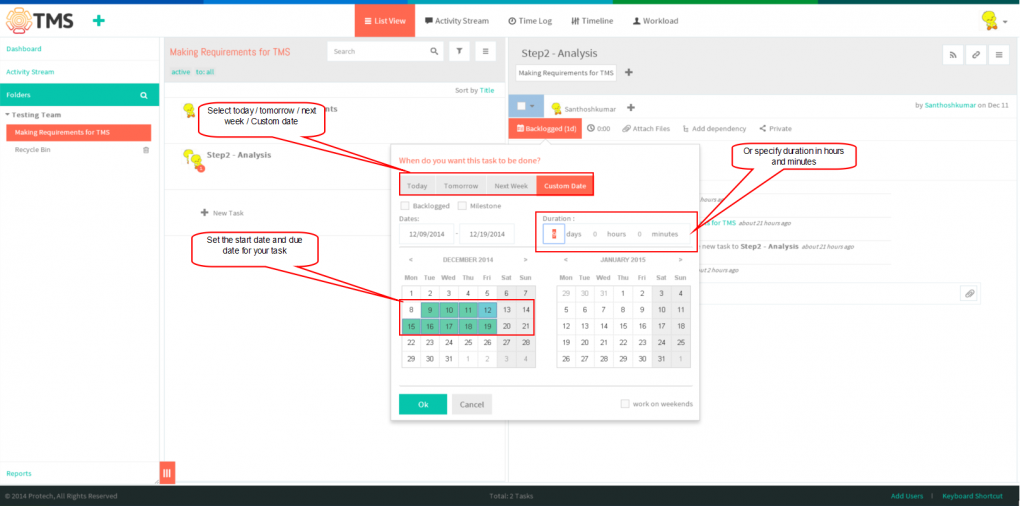
- Select the any one of the tab, to schedule the task then Set the start date and due date for your task and/or specify duration in hours and minutes to build a more precise schedule
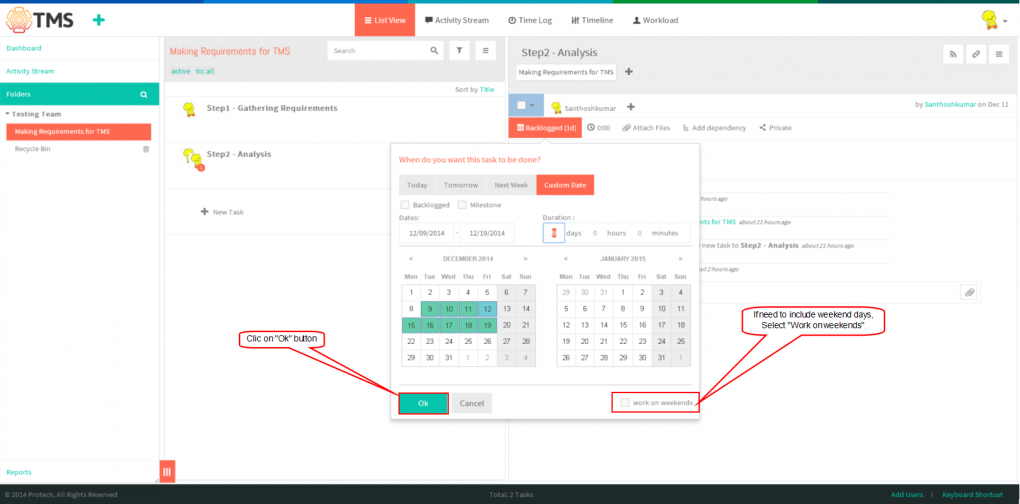
- When you schedule a task, note that only business days are counted when calculating the end date of a task, based on its duration and start date. So, if you’d like to include weekend days as well, please check the “work on weekends” option
- After scheduling click on "Ok" Button
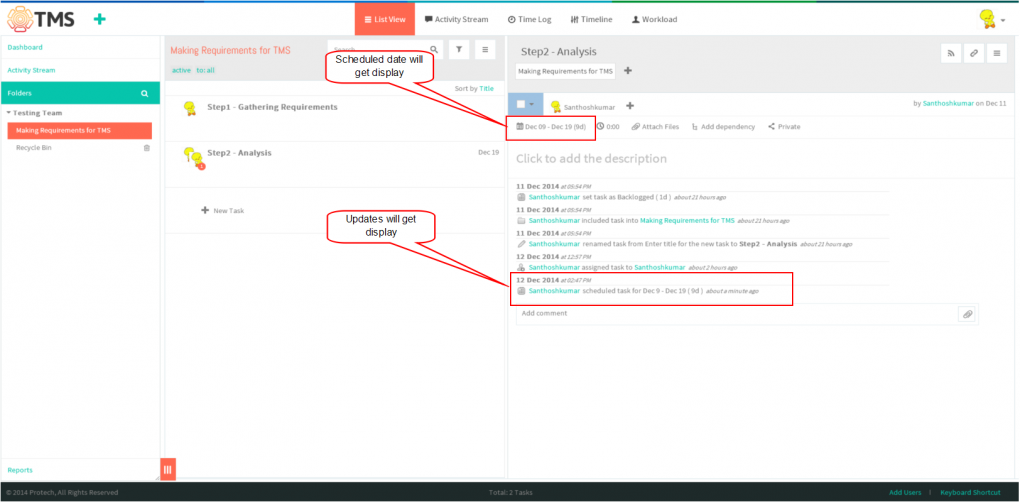
- Schedule date will get display and updates will get display in "Activity stream" of an task
Set the task status
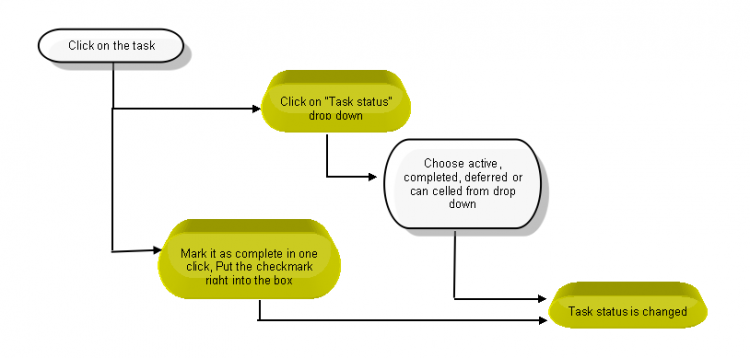
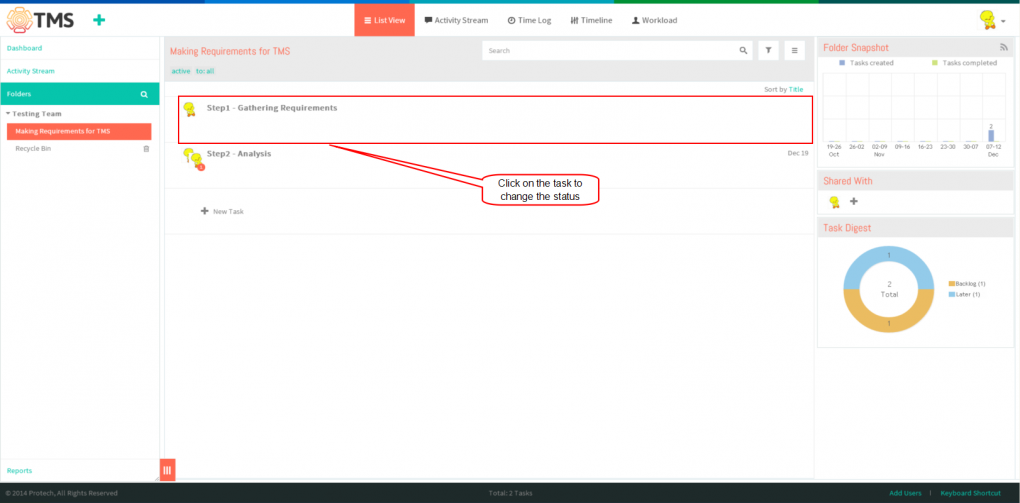
- To set the task’s status, click on the task
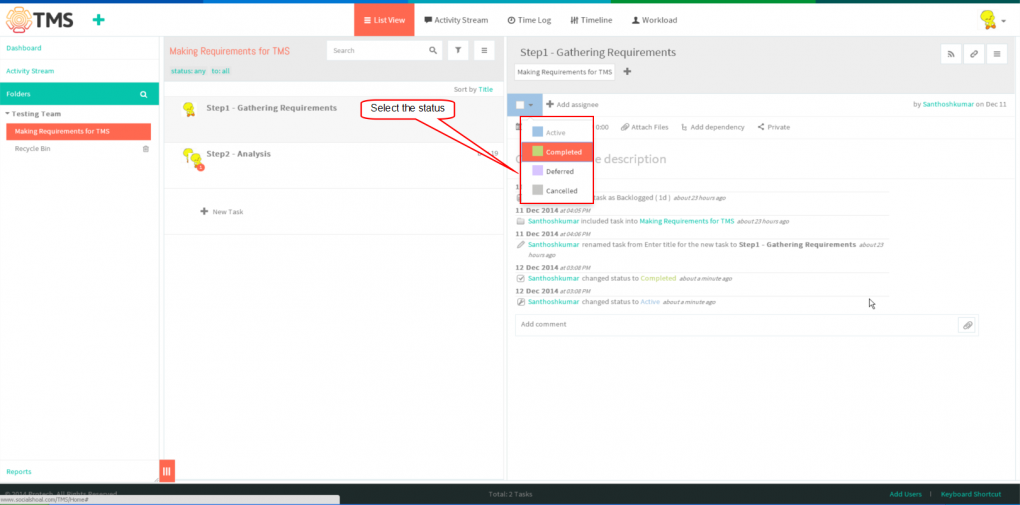
- Choose active, completed, deferred or cancelled from the drop-down menu as shown below
- The “deferred” status can be useful for postponed or blocked activities, which you do not want to cancel, just put them on hold. Any type of task (planned, backlogged, or milestone) can be set to deferred.
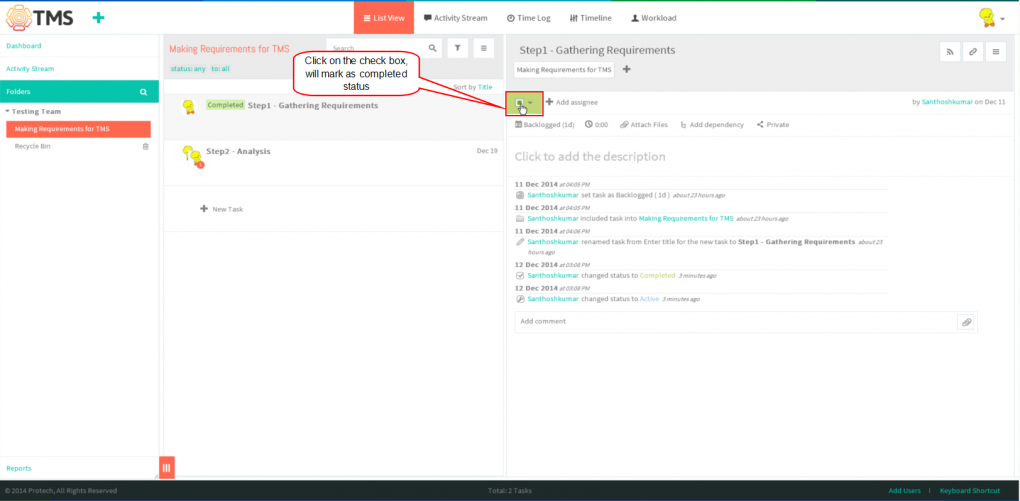
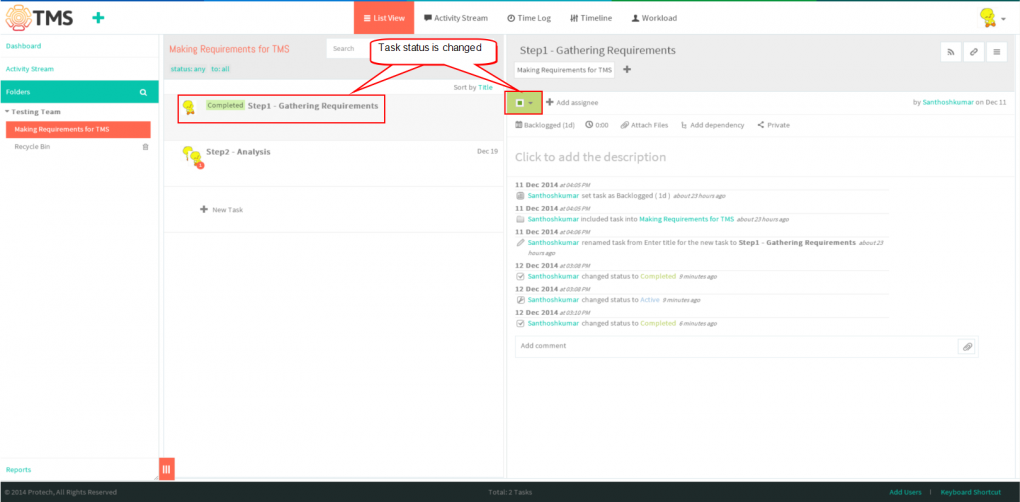
- If the task is done and you want to mark it as complete in one click, select the check box and proceed to the next task
- Task will get changed after marking the status as completed
Tag a task (organize tasks into folders)
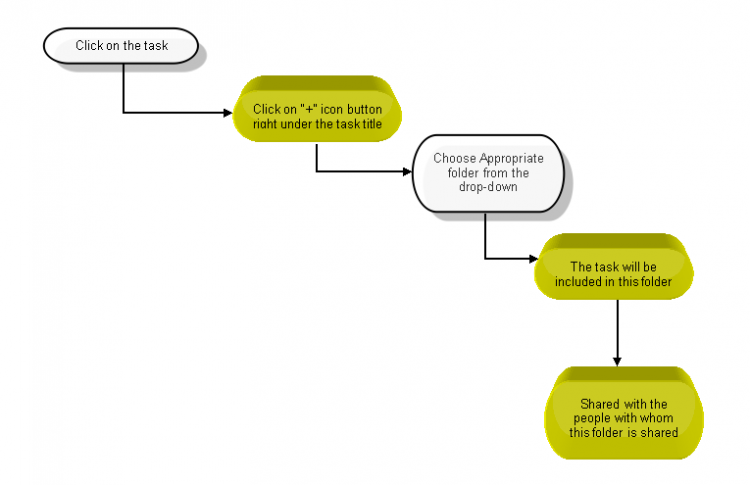
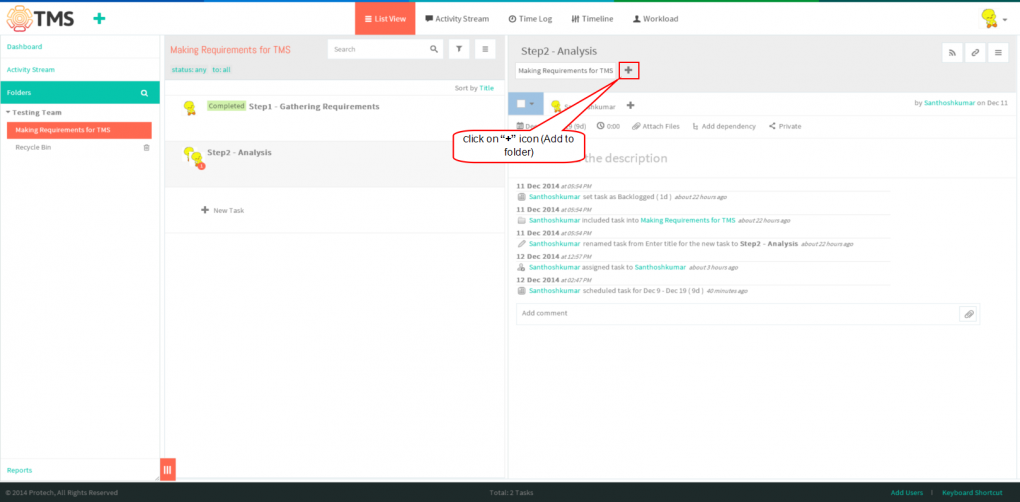
- Click on the task in list view pane (i.e. Middle pane)
- After clicking the task, Then click on “+” icon button right under the task title
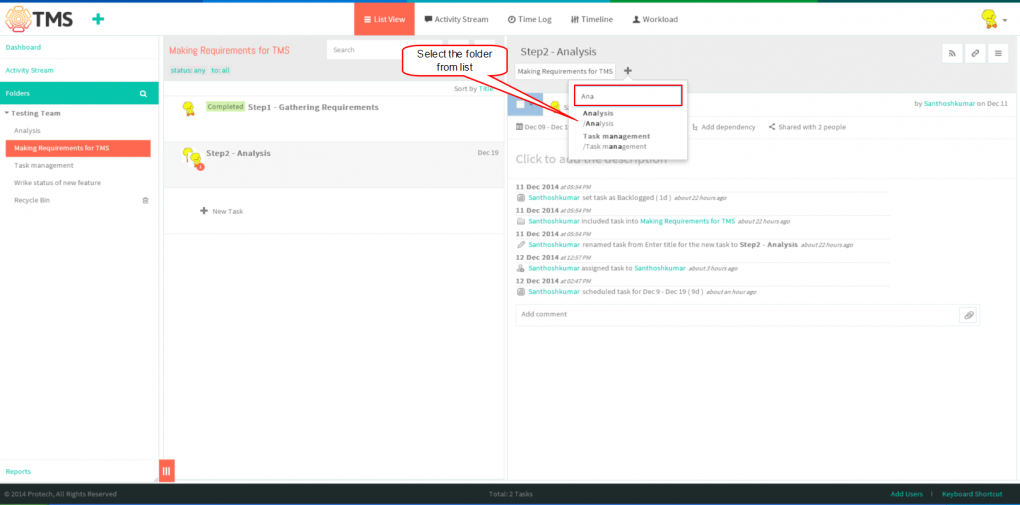
- Select the folder from the list, after selecting folder gets added
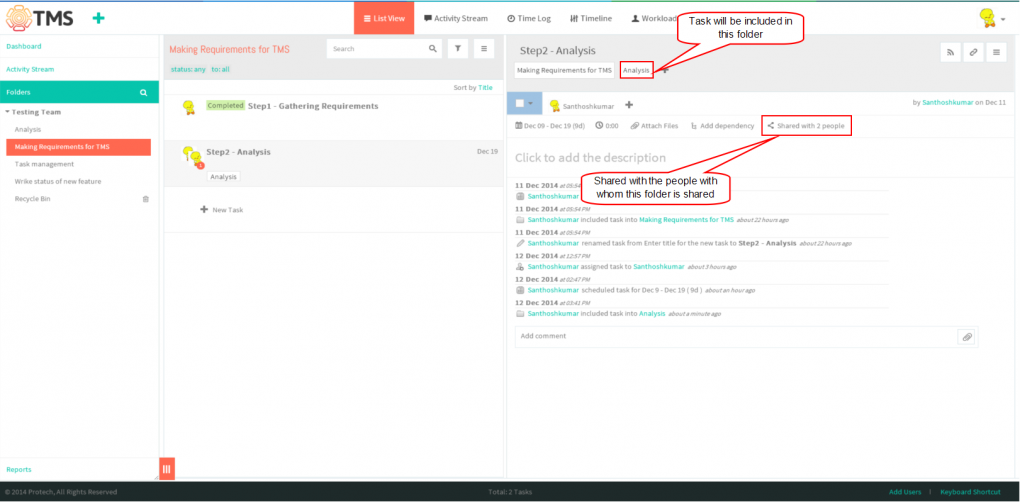
- After you click on the folder title, the task will be included in this folder and shared with the people with whom this folder is shared
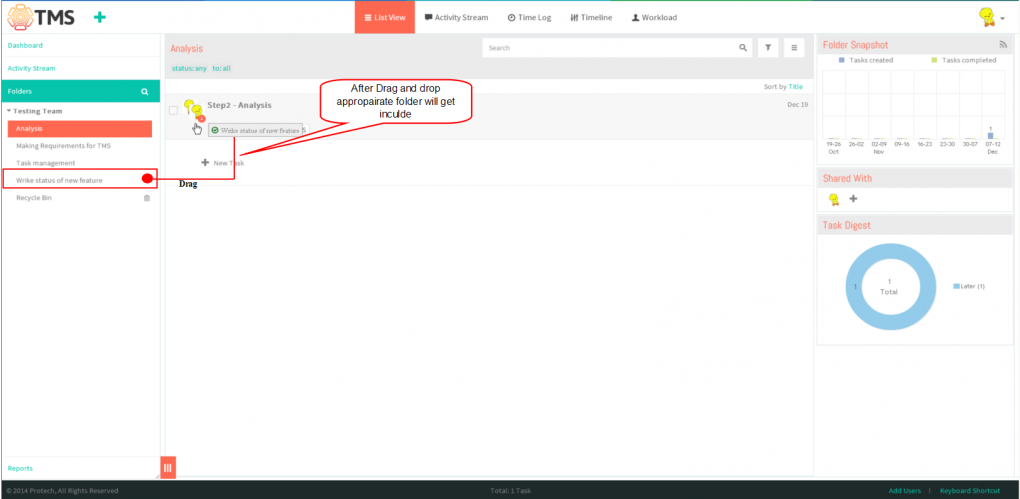
- To tag a task, just drag the necessary folder from the folder tree onto a task. The task also gets included in this folder. To tag multiple tasks, select them in the “List” view by checking the boxes on the left of the tasks, then drag a folder-tag from the folder tree onto a task list.
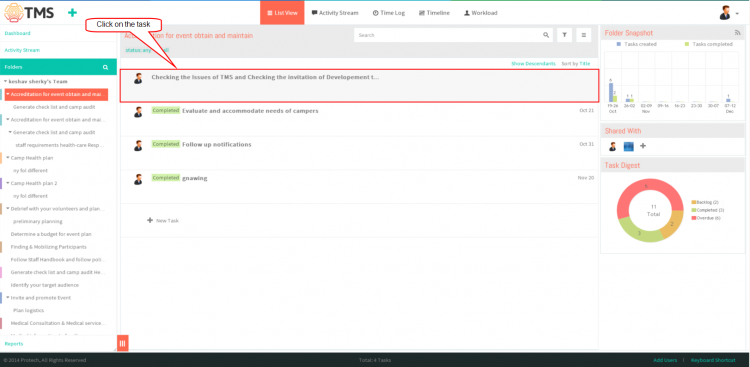
- By default, the task is shared with its author, current responsible party, past responsible party and the people with whom the parent folders of the task are shared. Click on task in list view pane
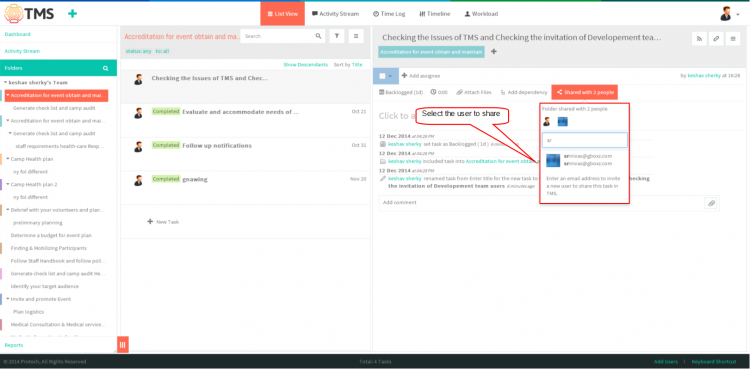
- Click on “Shared with N people” to see all the team members with whom the task is shared.You can share a task with more team members. Choose as many names as you need from the drop-down menu.
- Shared user will get display when we click on the "share with N people", Appropriate task will get display to shared user
- If the right name is not in the drop-down menu, you can invite that person to join TMS and grant him or her a license. enter the User mail id and then click on "Invite", appropriate user will get invitation mail, after accepting task will get display to the user
Follow a task
Cross-link tasks
Checklists
Note: This option is not available in TMS, flow as per wrike

