Difference between revisions of "Create a task"
(→Share a task) |
|||
| (10 intermediate revisions by 2 users not shown) | |||
| Line 1: | Line 1: | ||
{| | {| | ||
| − | | [[ | + | | [[TMS-VERSION 2|'''''>> Back To TMS-VERSION 2''''']] || [[Tasks|'''''>> Tasks''''']] |
|} | |} | ||
| Line 103: | Line 103: | ||
'''Task Scheduling Video''' | '''Task Scheduling Video''' | ||
| − | [[File: | + | [[File:Schedule task.gif]] |
==''' Set the task status''' == | ==''' Set the task status''' == | ||
| Line 184: | Line 184: | ||
'''Tagging Tasks Into Folder Video ''' | '''Tagging Tasks Into Folder Video ''' | ||
| − | [[File: | + | [[File:Organize tasks.gif]] |
==''' Share a task'''== | ==''' Share a task'''== | ||
| Line 241: | Line 241: | ||
[[File:TMS31.PNG]] | [[File:TMS31.PNG]] | ||
| + | |||
| + | ''' Follow Task Video''' | ||
| + | |||
| + | [[File:Follow Task.gif]] | ||
==''' Cross-link tasks''' == | ==''' Cross-link tasks''' == | ||
| Line 278: | Line 282: | ||
*After clicking comment icon, The link will be automatically converted into the underlined task title which is shown in below. On clicking the task | *After clicking comment icon, The link will be automatically converted into the underlined task title which is shown in below. On clicking the task | ||
title will show the task page | title will show the task page | ||
| − | Note: In TMS will display the link only. | + | |
| + | Note: In TMS will display the link only. This is mock up screen shot which is shown below | ||
[[File:TMS35.PNG]] | [[File:TMS35.PNG]] | ||
| Line 284: | Line 289: | ||
==''' Checklists''' == | ==''' Checklists''' == | ||
| − | *Note: This option is not available in TMS, | + | *Note: This option is not available in TMS, shown the mock up screen |
[[File:M12.PNG]] | [[File:M12.PNG]] | ||
| + | |||
| + | *Click on the checklist icon which is in formatting panel, check box will get display which is shown in below screen | ||
| + | |||
| + | |||
| + | [[File:TMS433.PNG]] | ||
| + | |||
| + | |||
| + | *Enter the descrition, then hit enter key for next check box and we can select the check box which is shown in below image | ||
| + | |||
| + | |||
| + | [[File:TMS434.PNG]] | ||
==''' Print a task''' == | ==''' Print a task''' == | ||
| Line 310: | Line 326: | ||
[[File:TMS36.PNG]] | [[File:TMS36.PNG]] | ||
| + | |||
| + | '''Print Task Video''' | ||
| + | |||
| + | [[File:Print task.gif]] | ||
==''' Add dependencies to a task''' == | ==''' Add dependencies to a task''' == | ||
Latest revision as of 04:20, 13 April 2015
| >> Back To TMS-VERSION 2 | >> Tasks |
Contents
Follow the steps to Create a new task
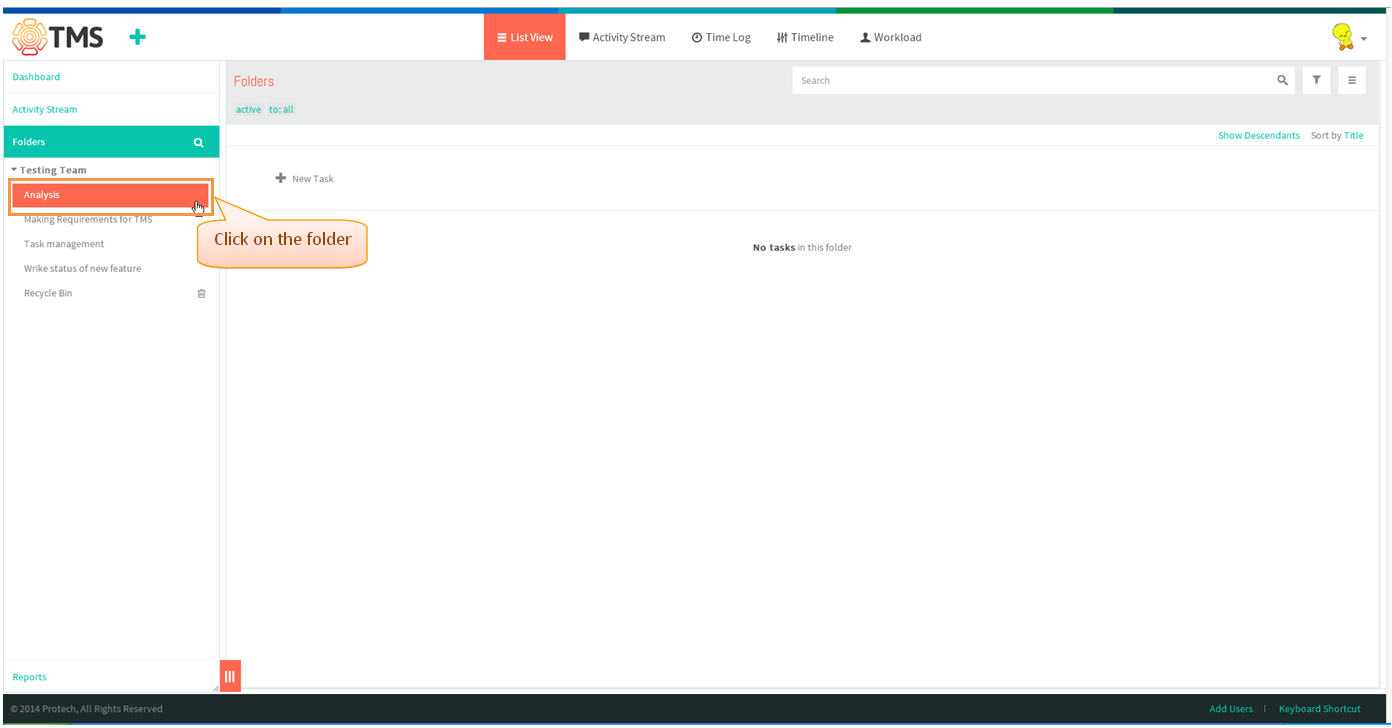
- To create a new task, you need to click on the folder in left hand pane.
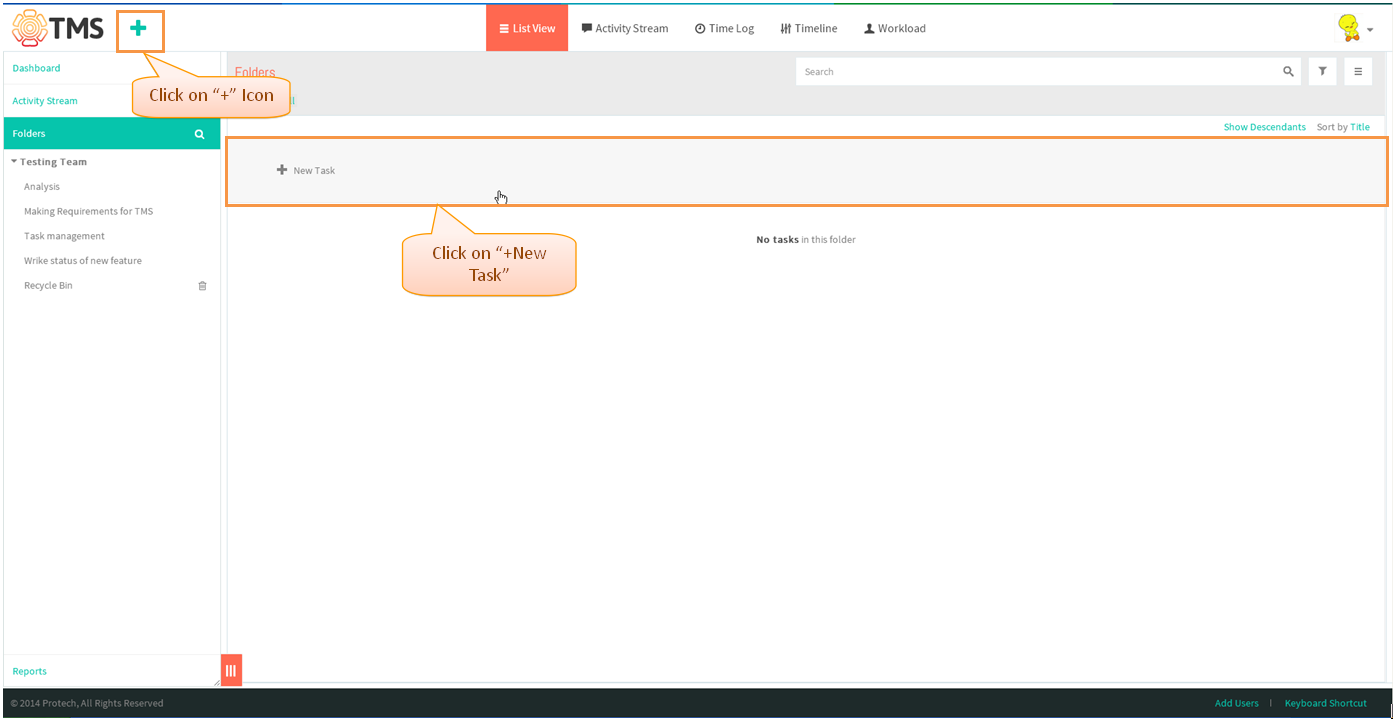
- Click on "+New Task" line in list view pane or "+" icon left top header, and enter the task name
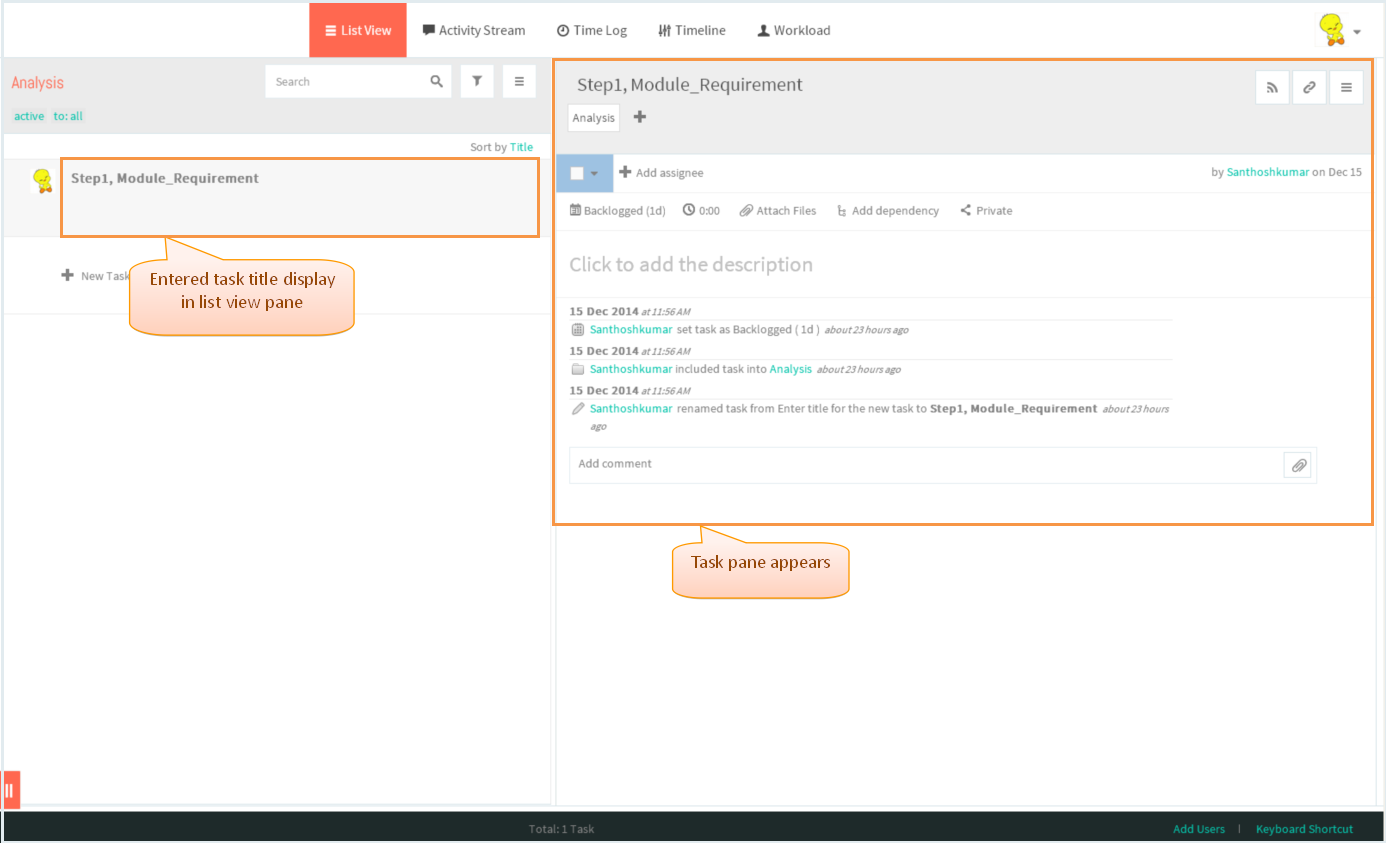
- Enter the task name, After entering task will get appears in third pane (i.e. Task pane)
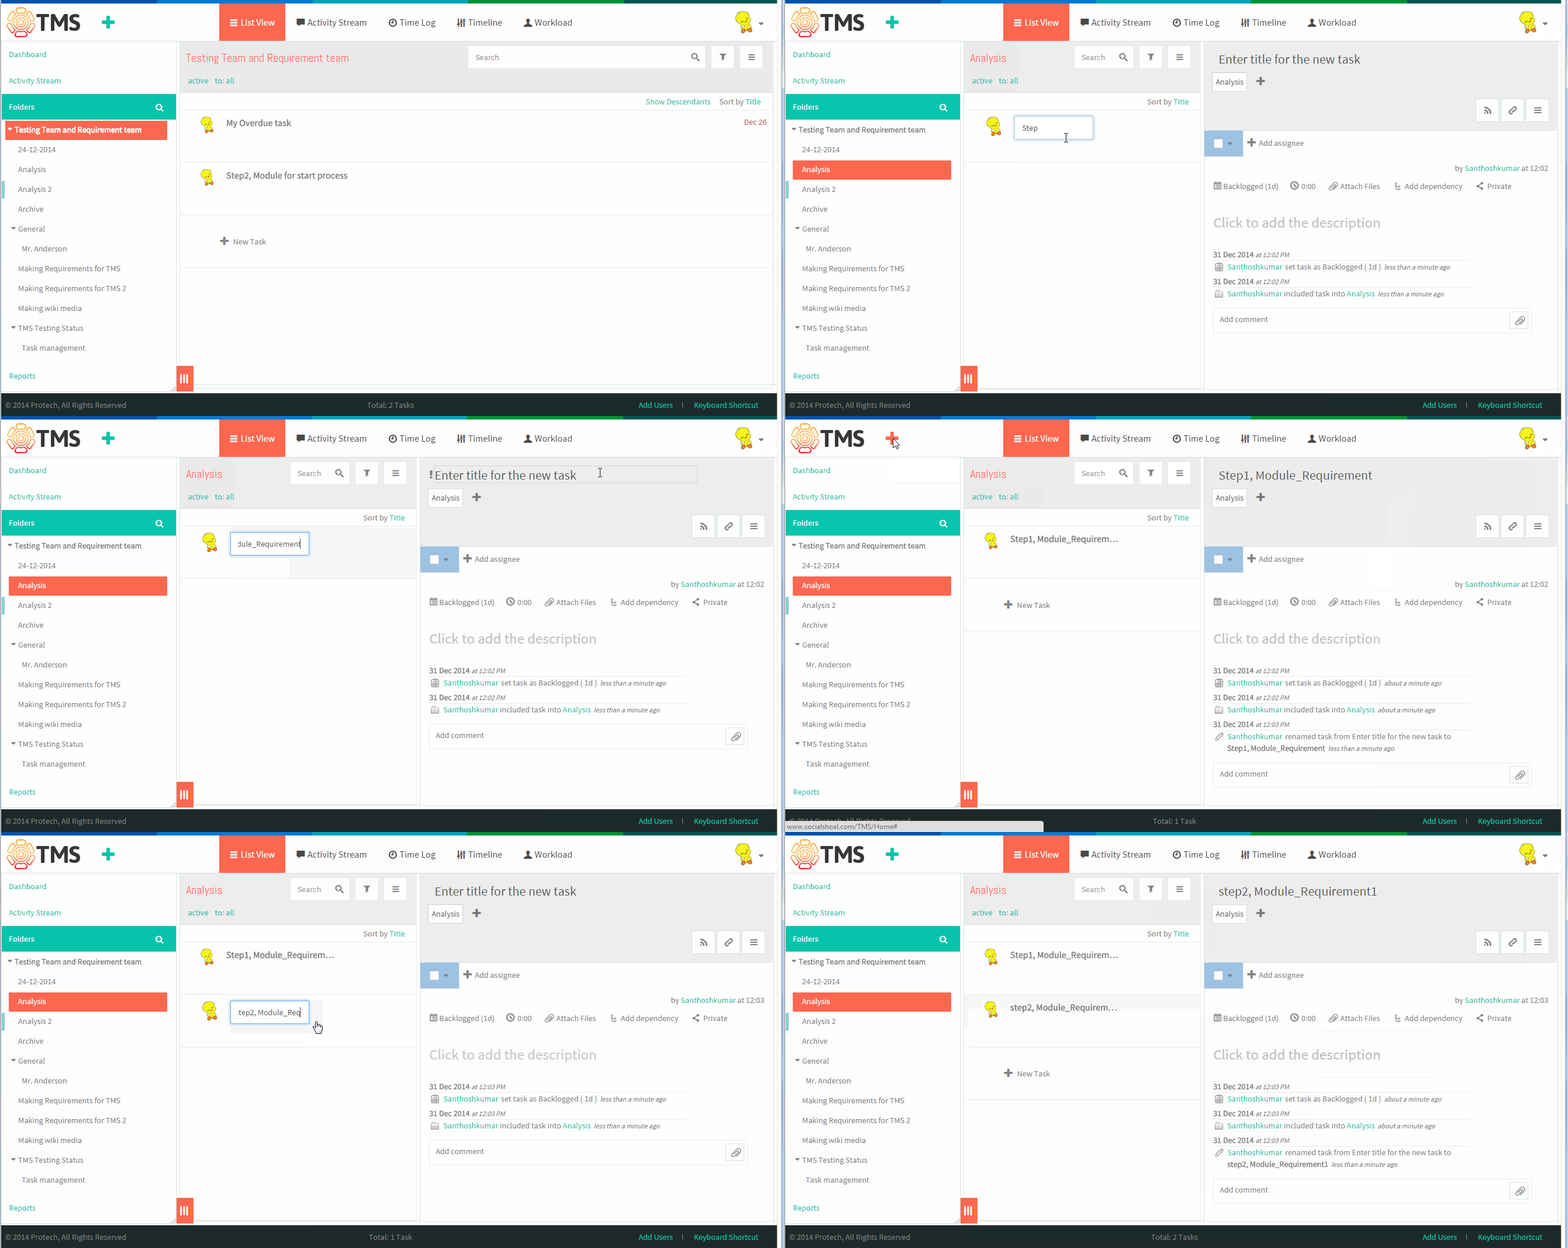
Create Task Video
Assign a task
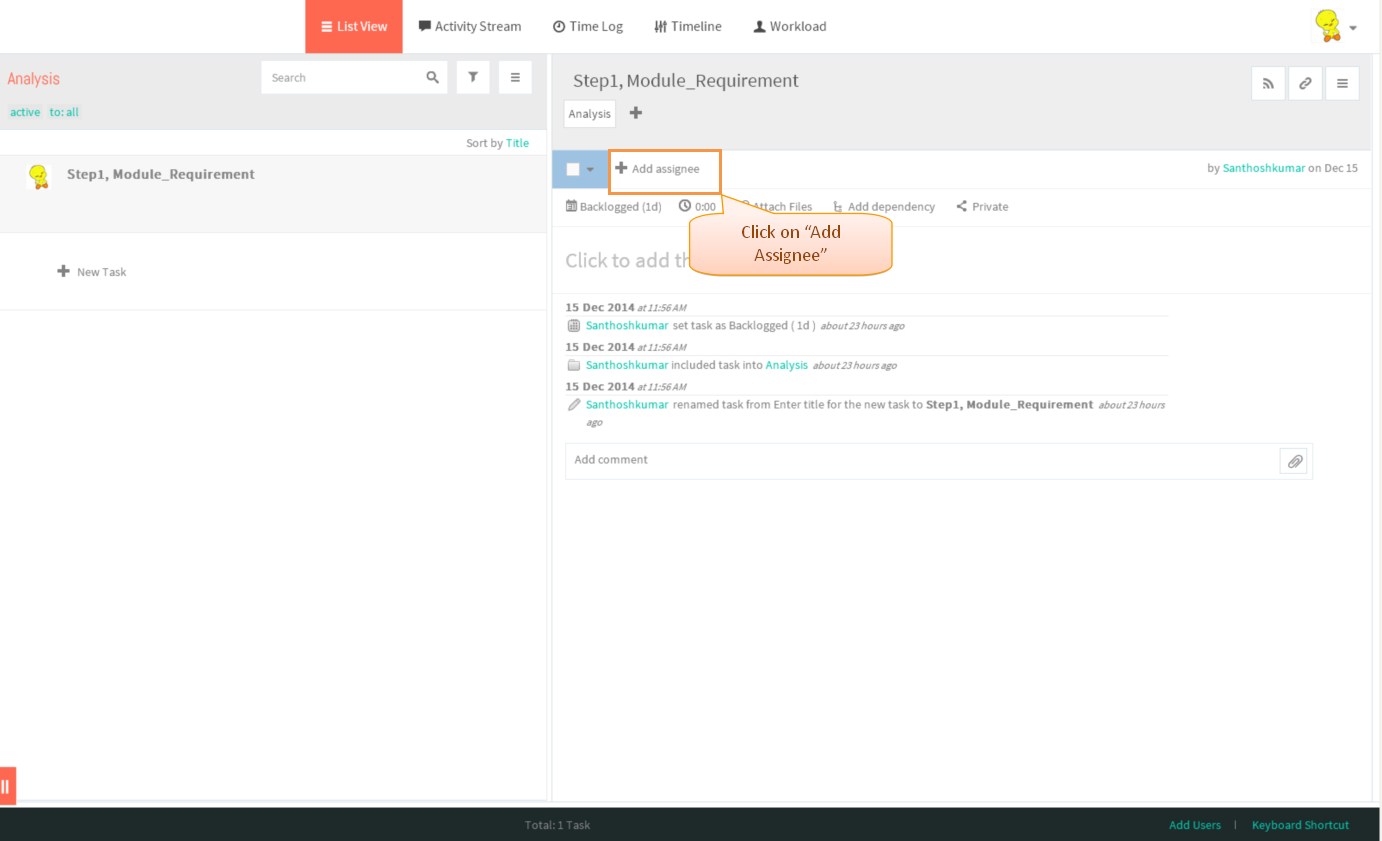
- User can assign the task by Clicking on task in list view pane. Task get appears
- Click on "Add Assignee" in task pane
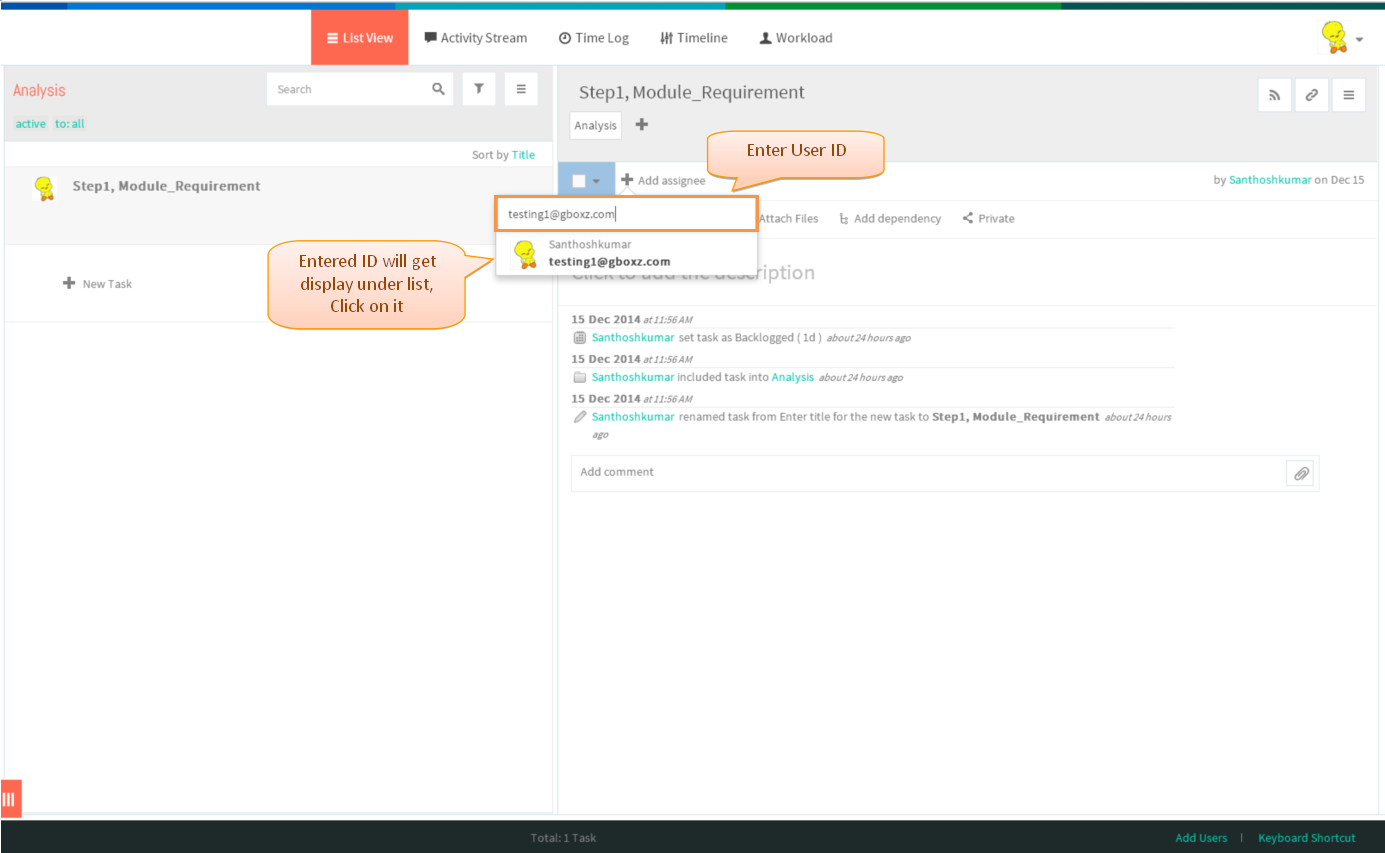
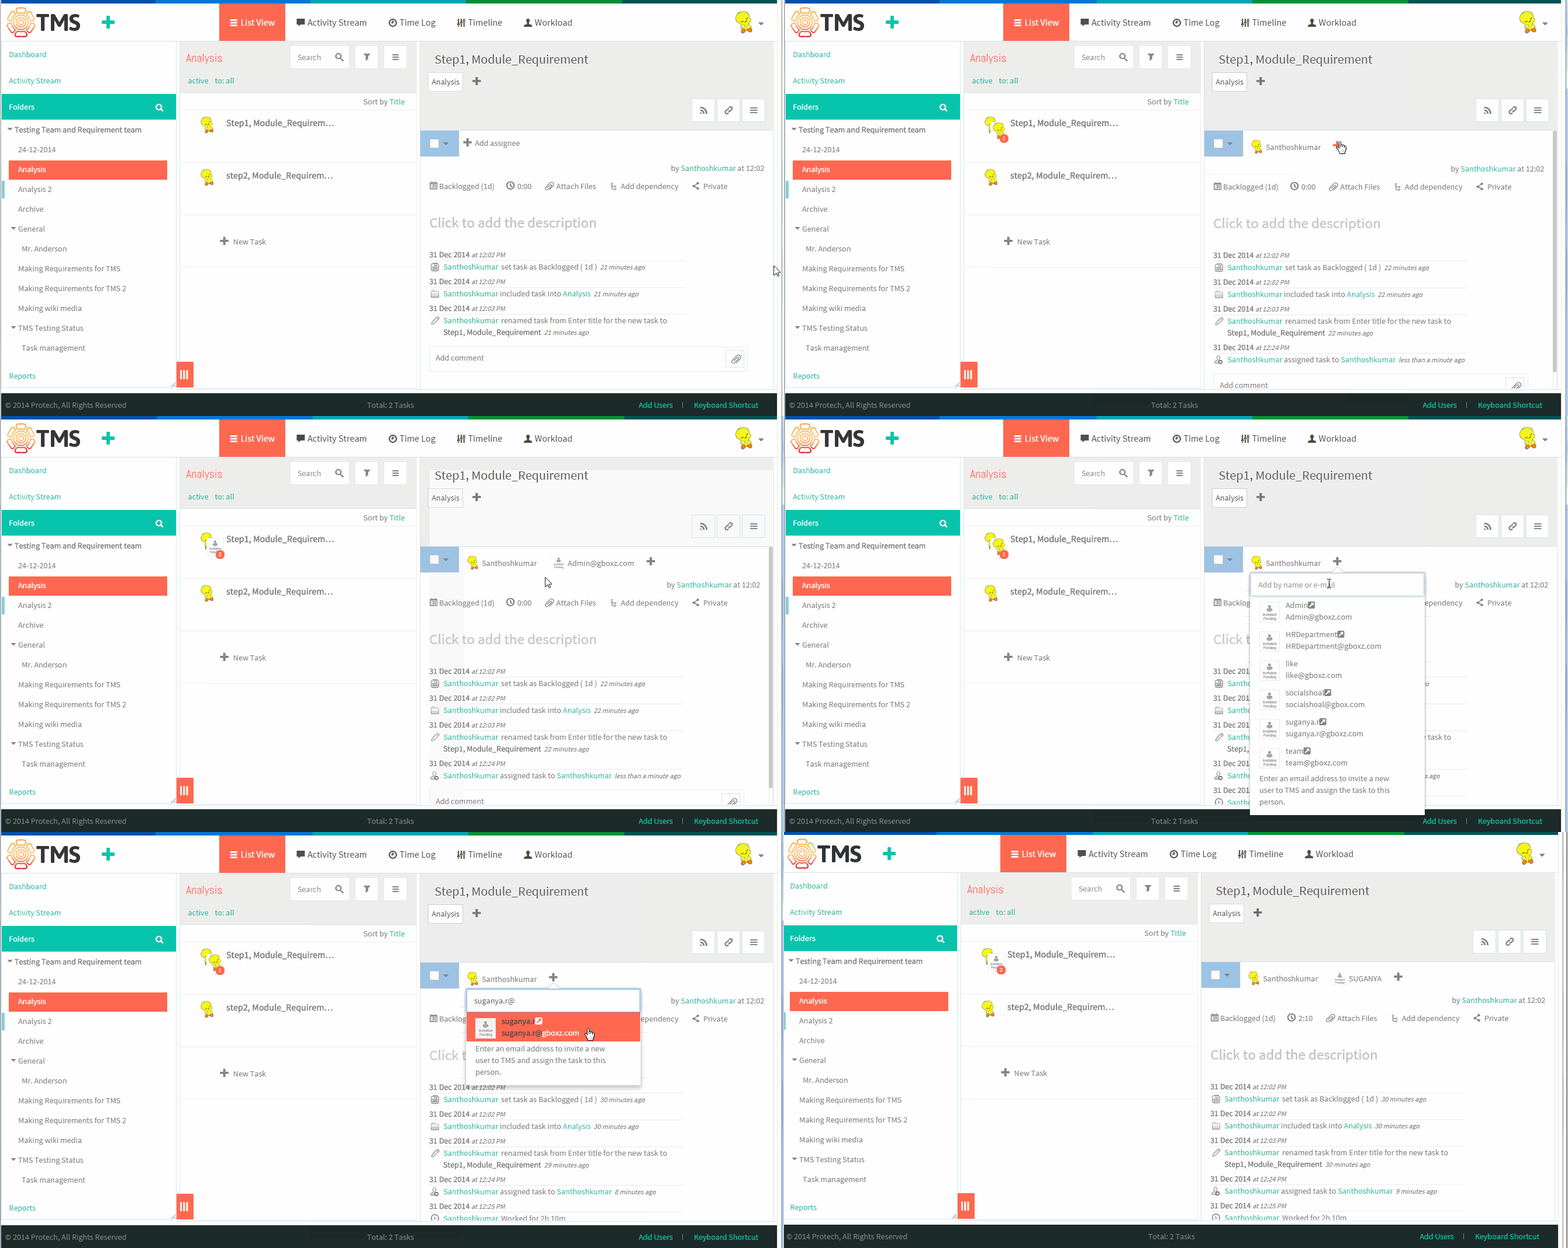
- Enter the mail id or username to assign, displays the list of searched username to select the assignee.Searched user is not found in the list means we can directly invite the user by clicking "Invite" option in the list,
appropriate user will get invited, once they accept the invitation
- Select the user from the list
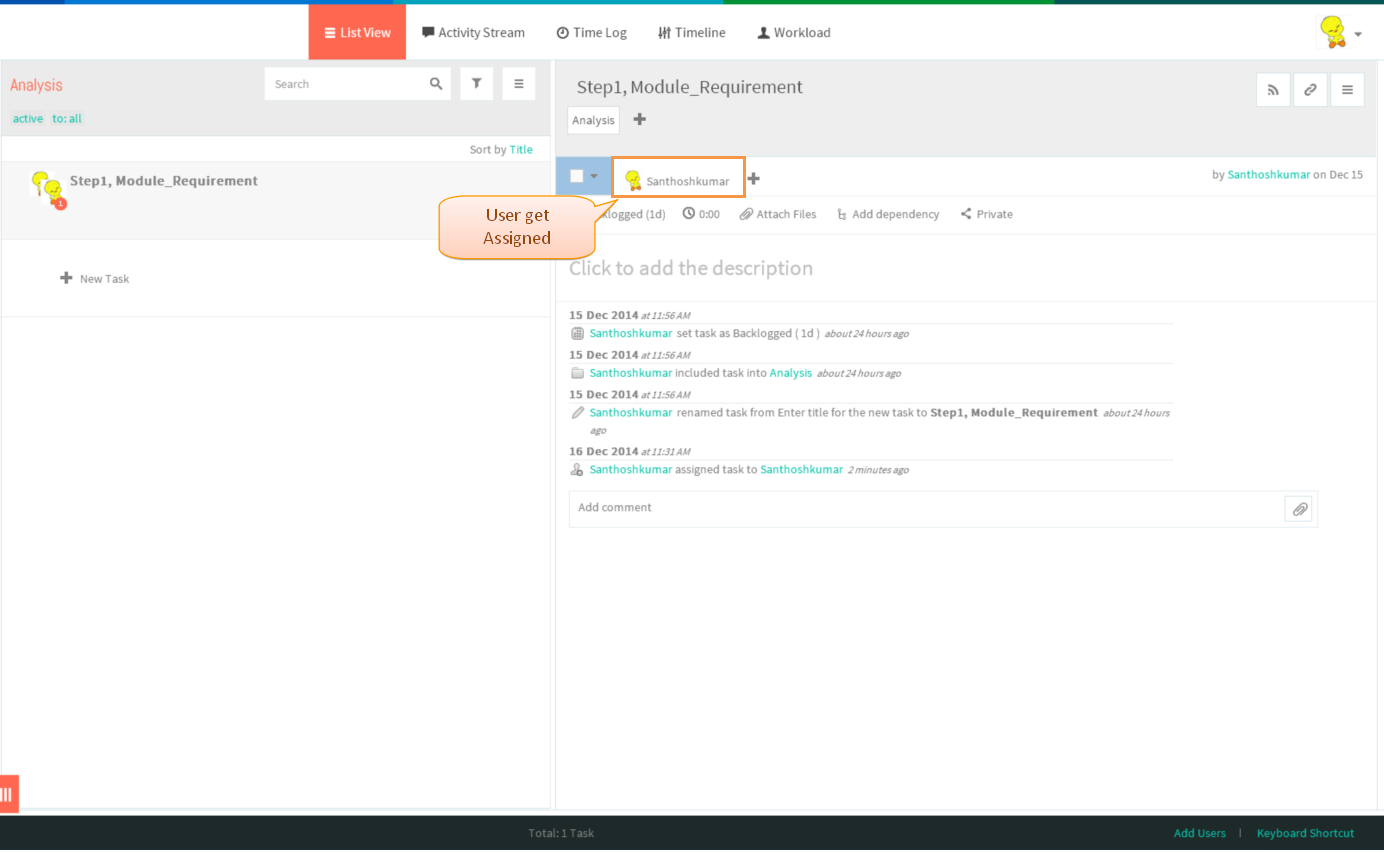
- Assigned user will get display as shown in below
Assigning a task Video
Schedule a task
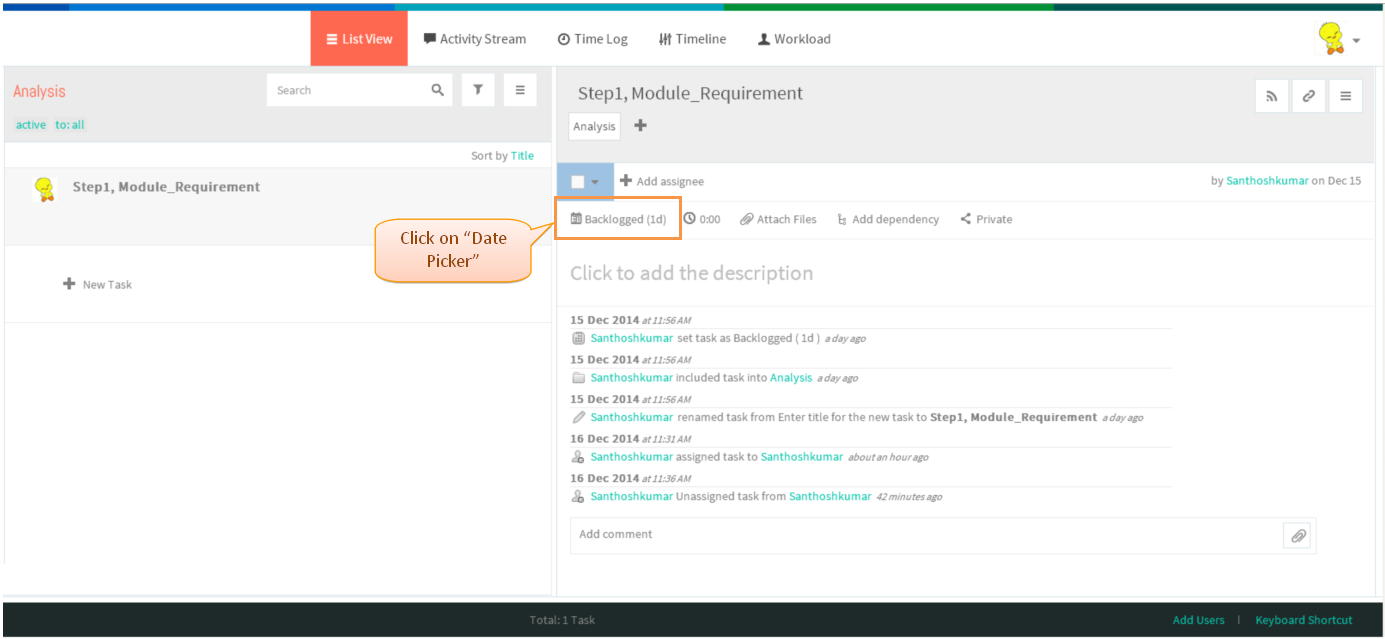
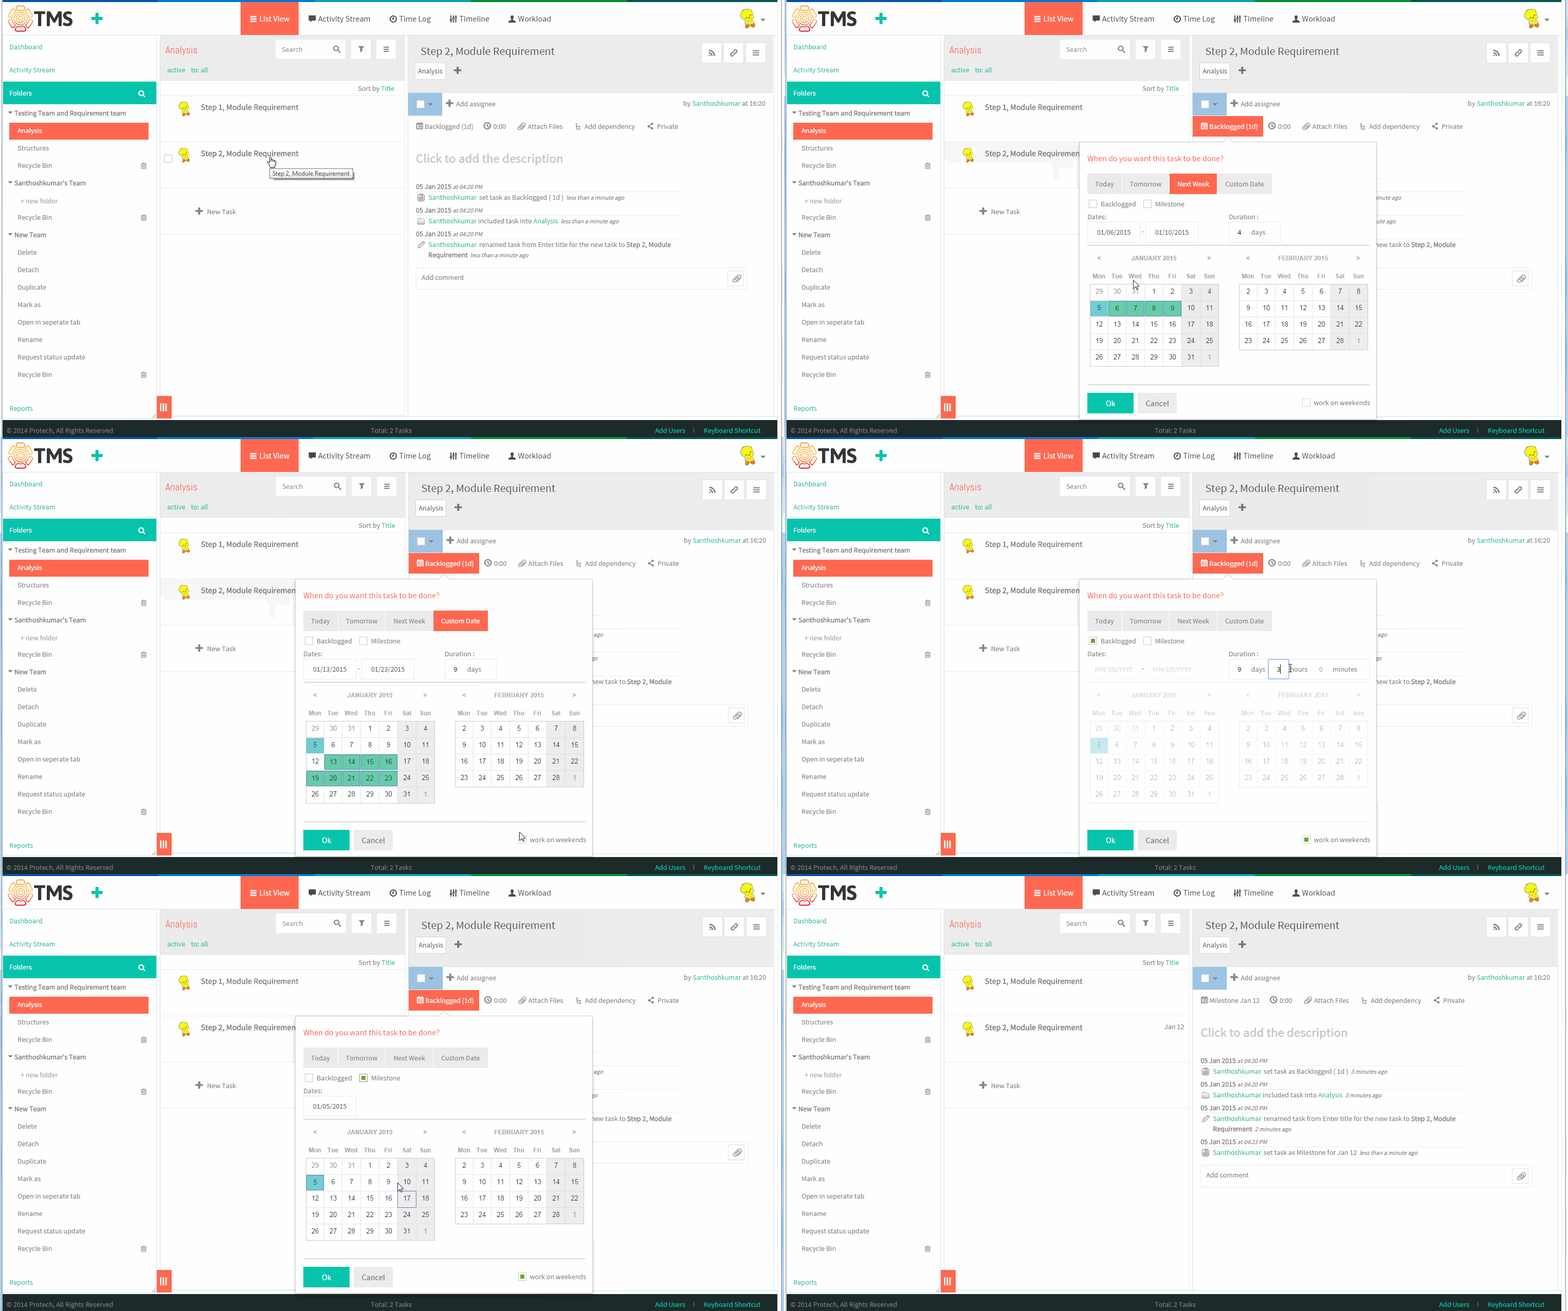
- Click on Date Picker to schedule the date
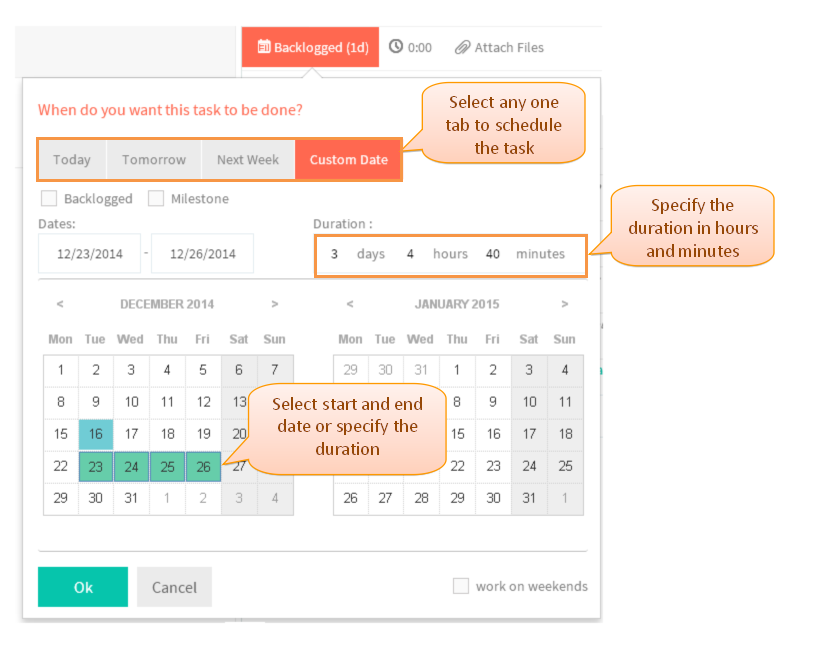
- Milestone, to schedule the task with only a due date. Backlogged, to schedule the task with only the duration without the exact date and Other options are tomorrow, today and custom date.
- Select the any one of the tab, then select the duration for the task
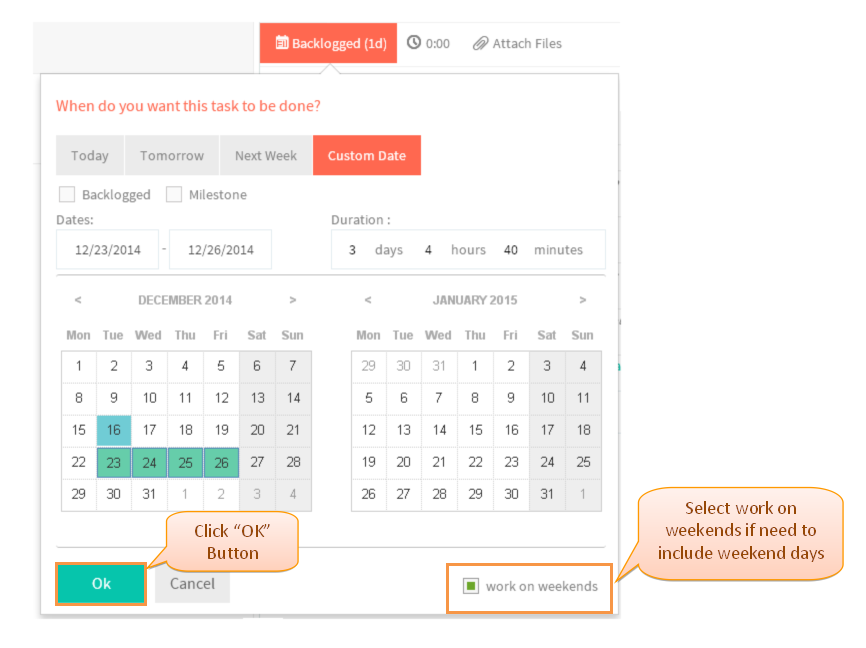
- Task will be include only the weekdays if, we need to schedule the task in weekend days we can
select "Work on weekends" option, After scheduling click on "Ok" Button
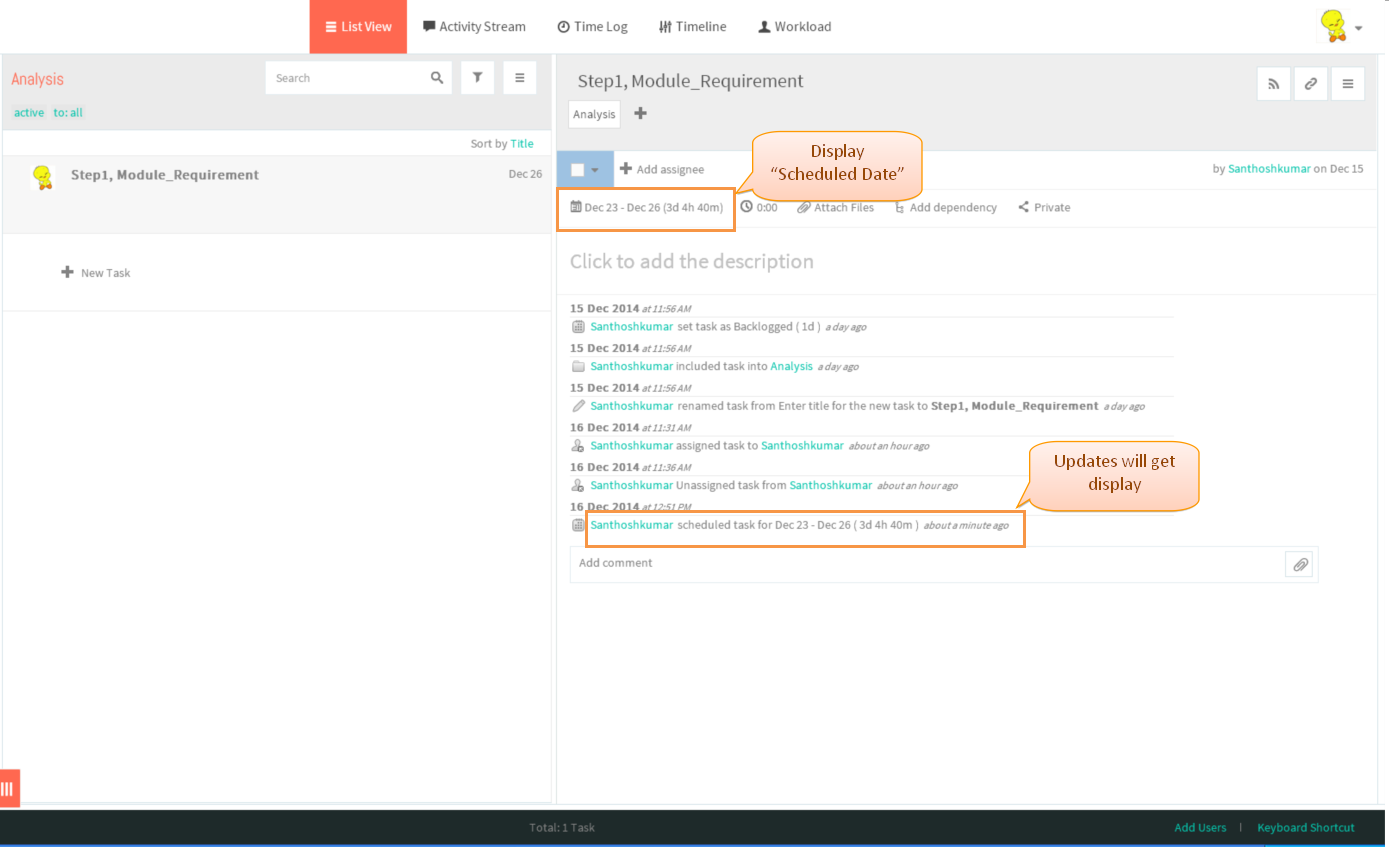
- Schedule date will get display and updates will get display in "Activity stream" of an task
Task Scheduling Video
Set the task status
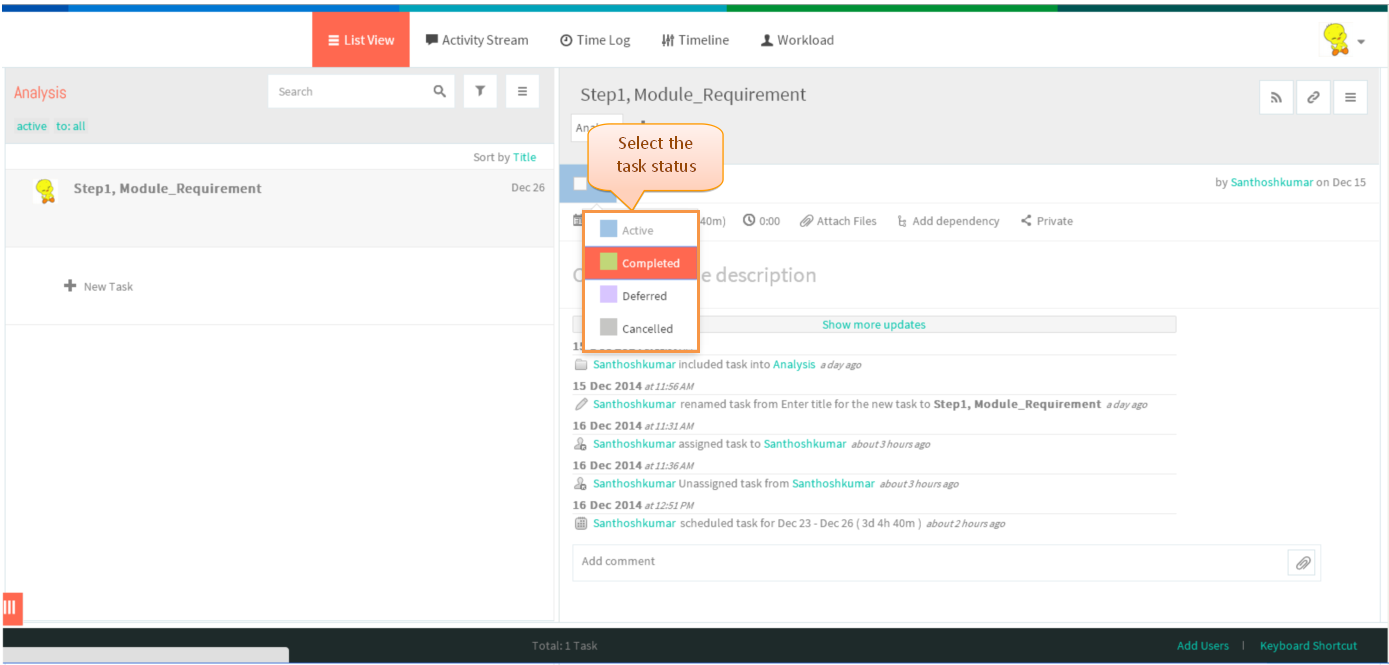
- To set the task’s status, click on the task in list view, task pane gets open in third pane
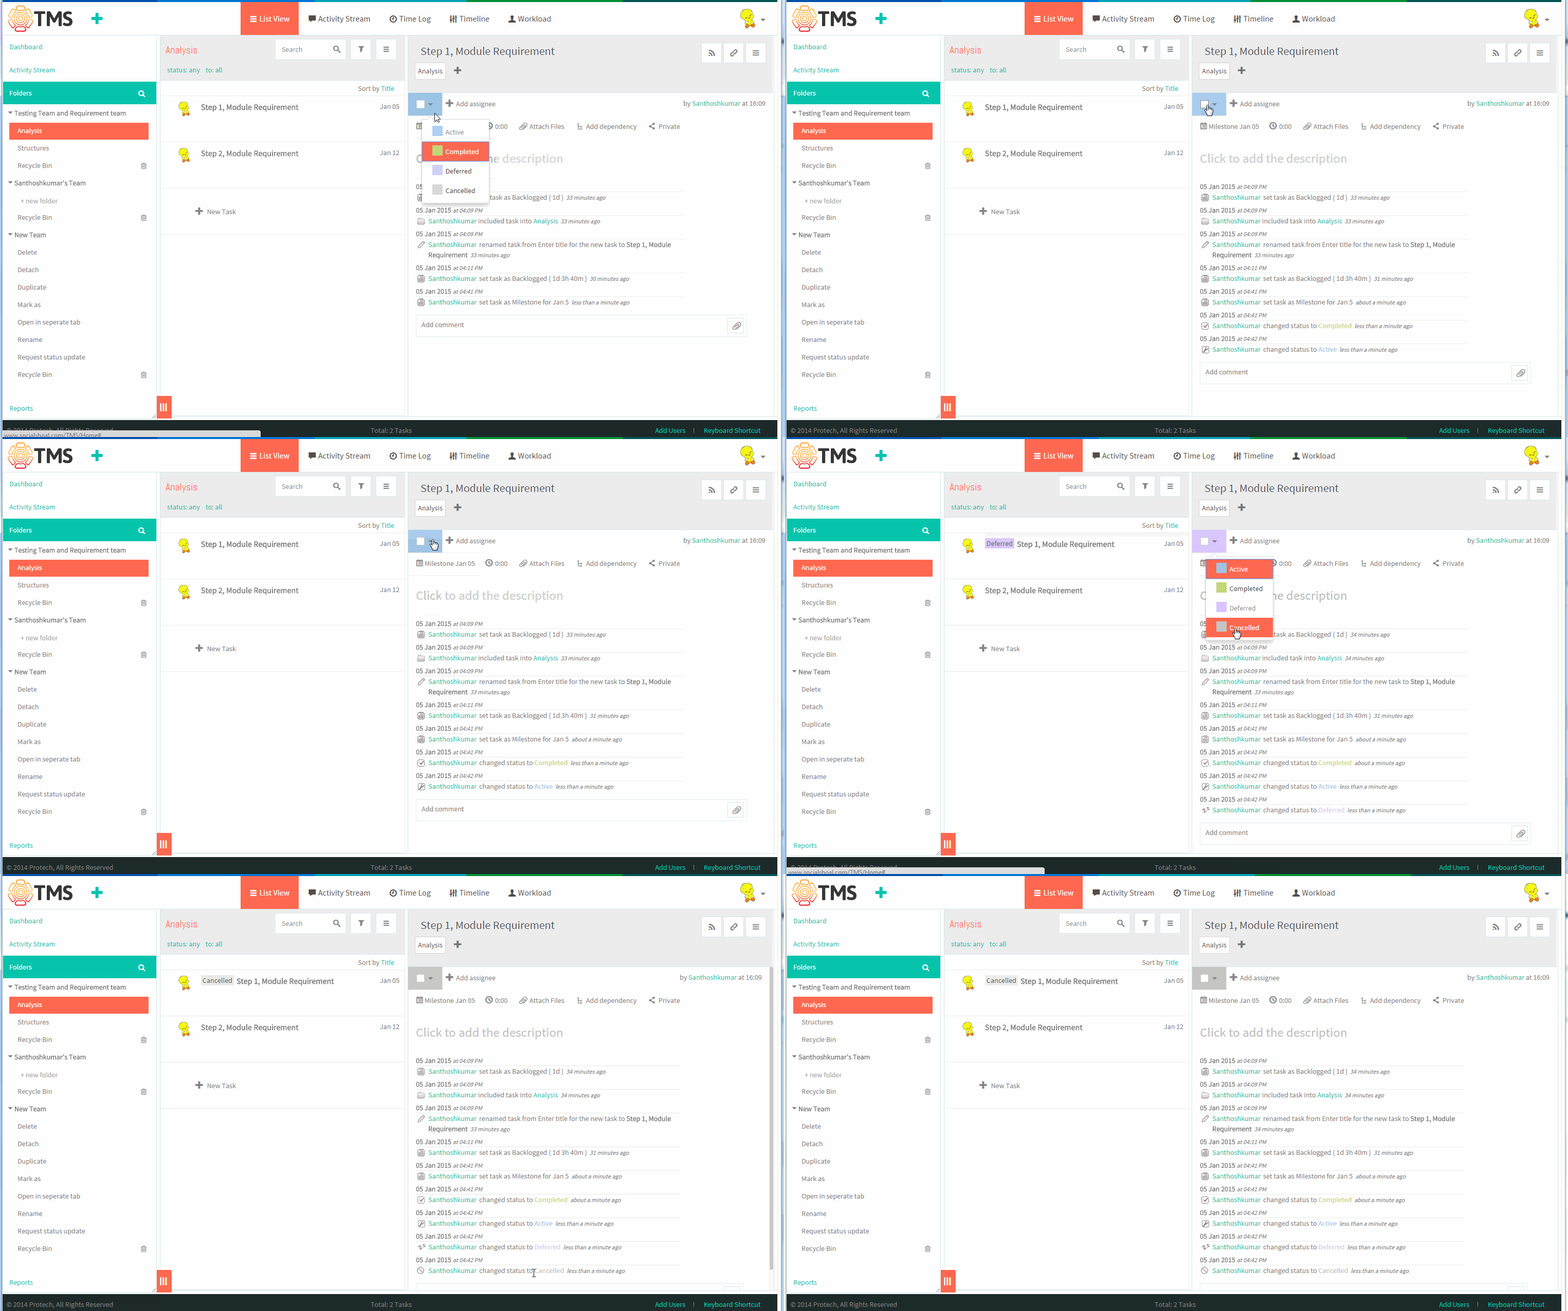
- If task is completed we can change the status as completed, To postpond the task choose deferred status, to cancelled the task choose cancelled status
- Choose active, completed, deferred or cancelled from the drop-down menu as shown below
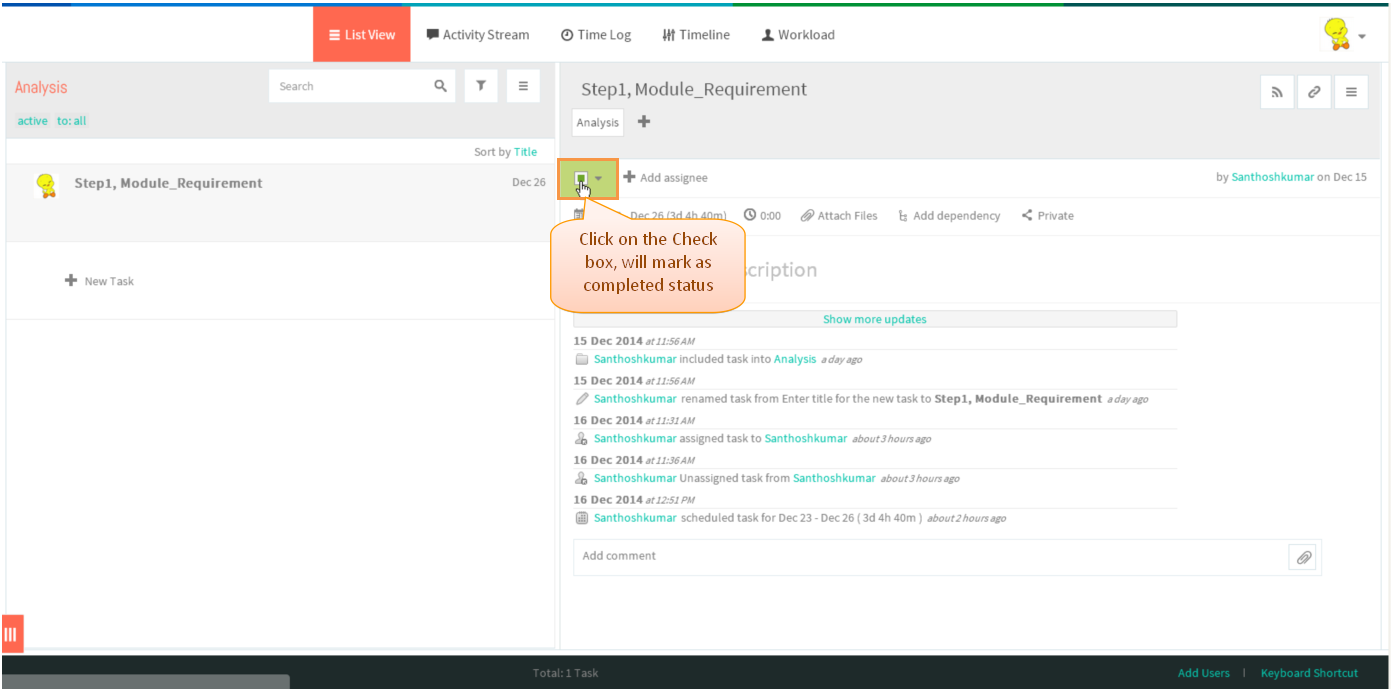
- We can also make a task as completed status by single click on the check box, which is shown below
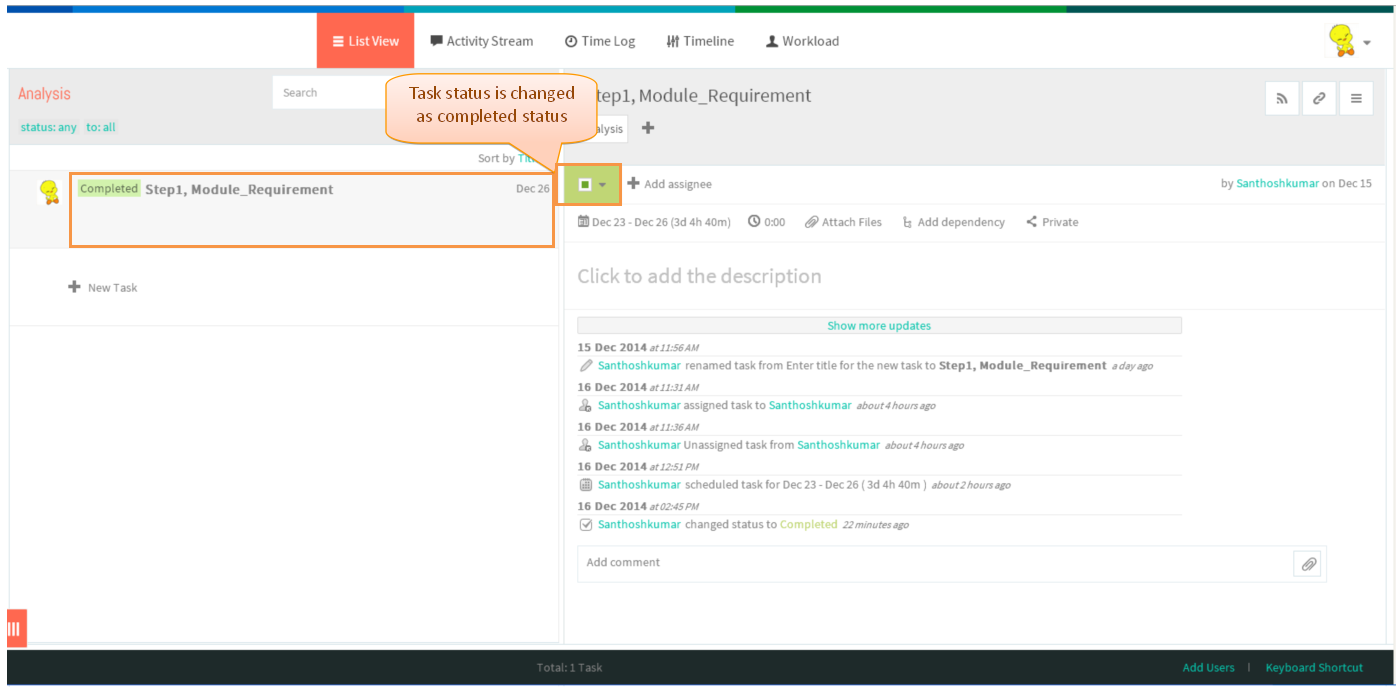
- Task will get changed after marking the status as completed
Task status change Video
Tag a task (organize tasks into folders)
- Click on the task in list view pane (i.e. Middle pane)
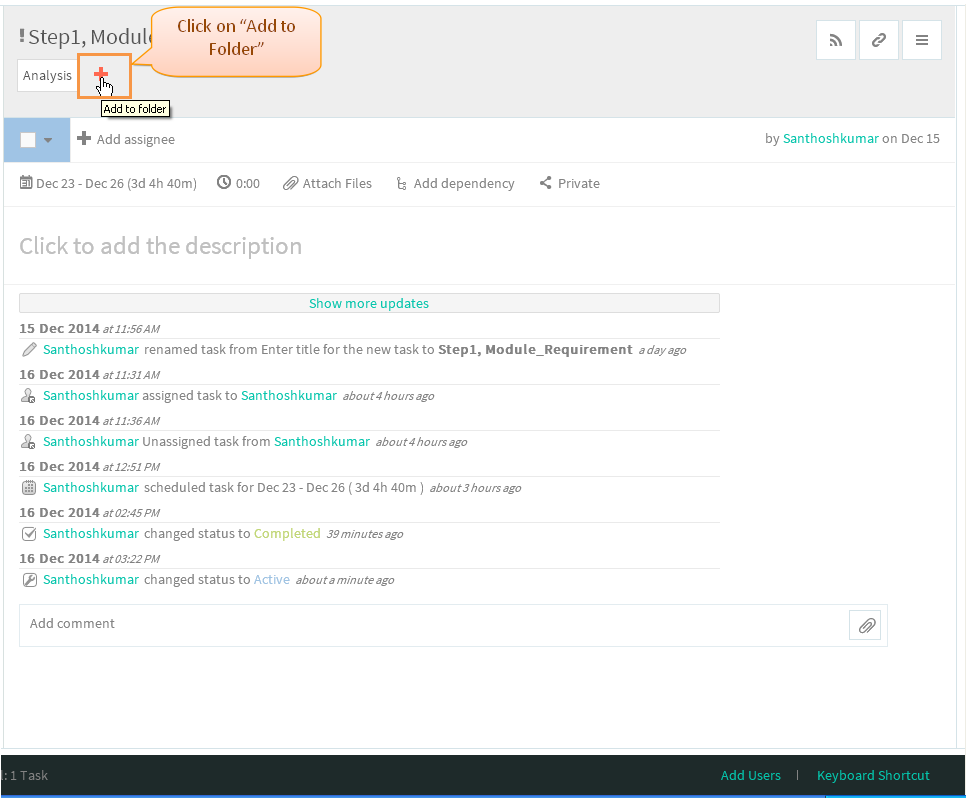
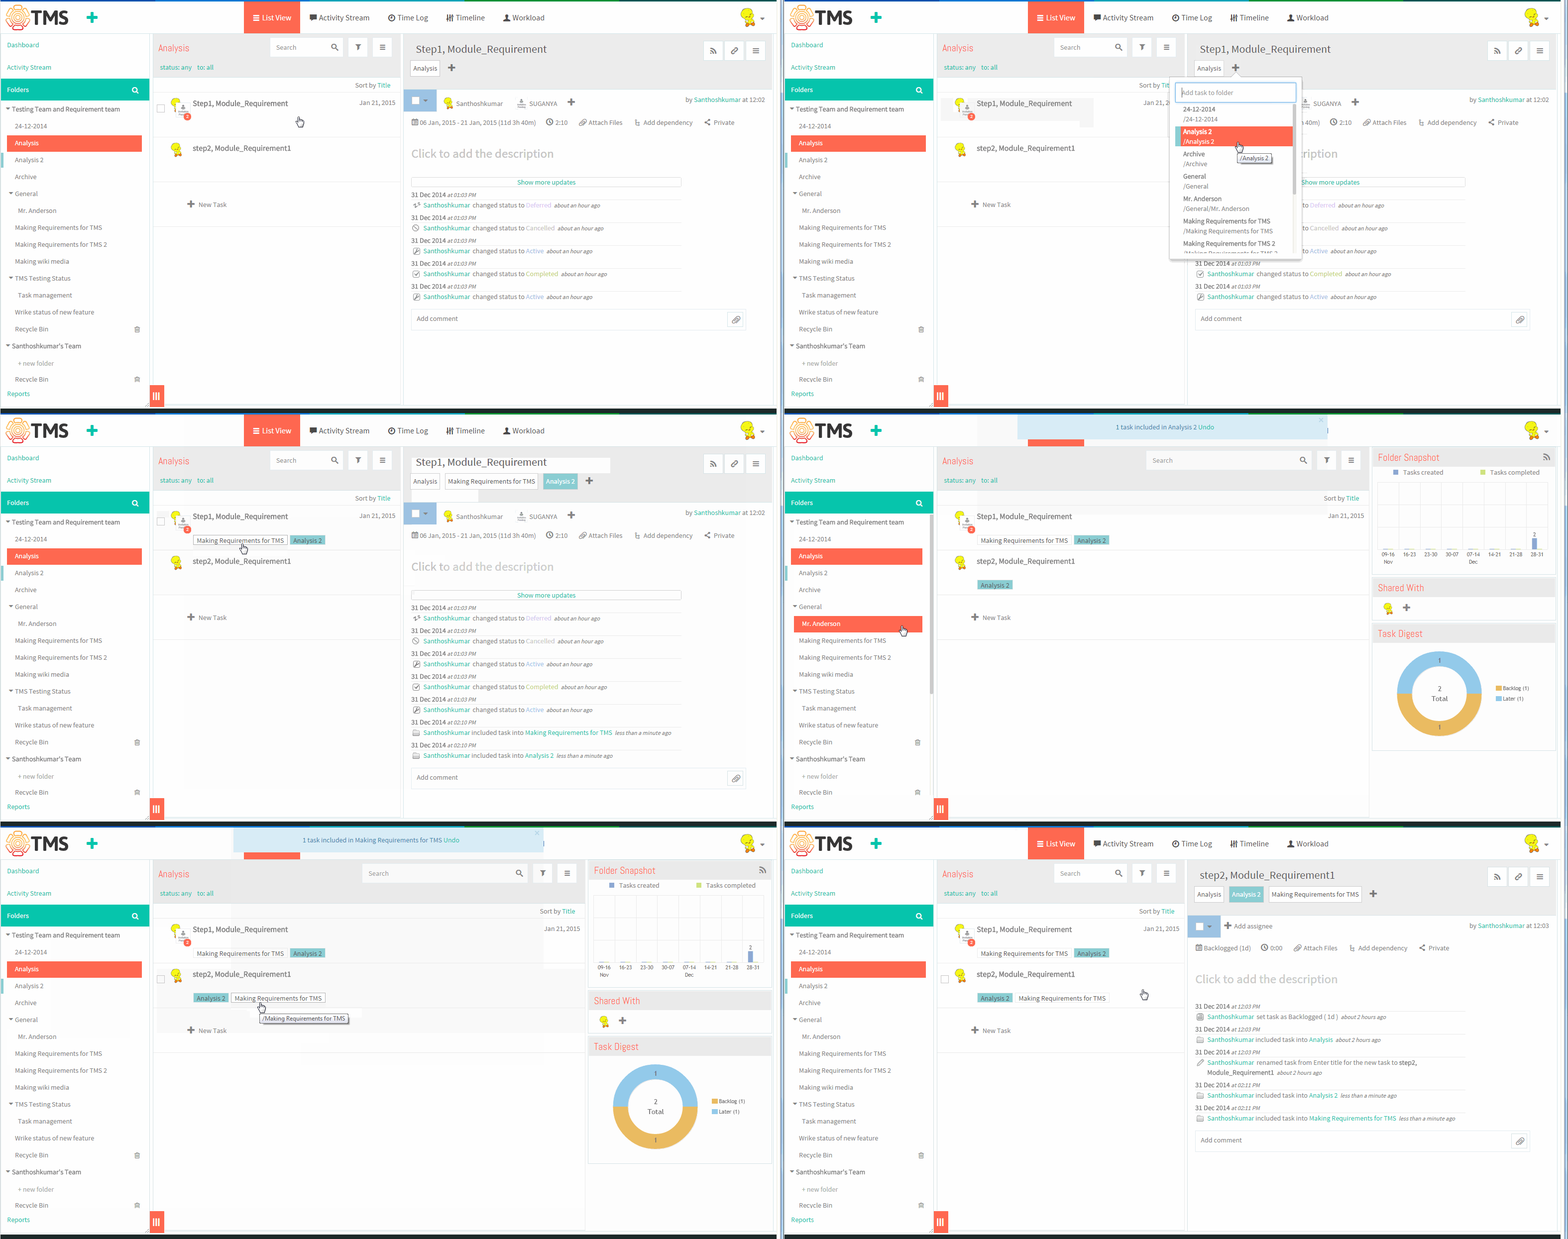
- Task pane gets open, Then click on “+” (Add to Folder) icon button right under the task title which is shown below
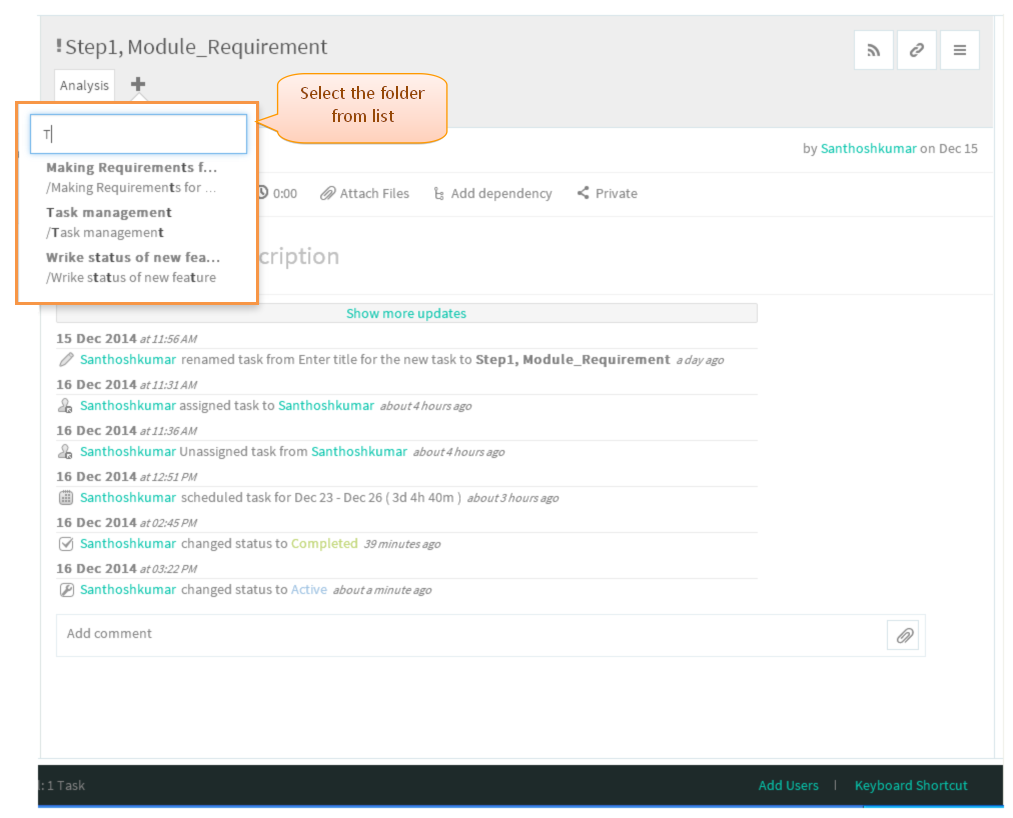
- Select the folder from the list, after selecting folder gets added
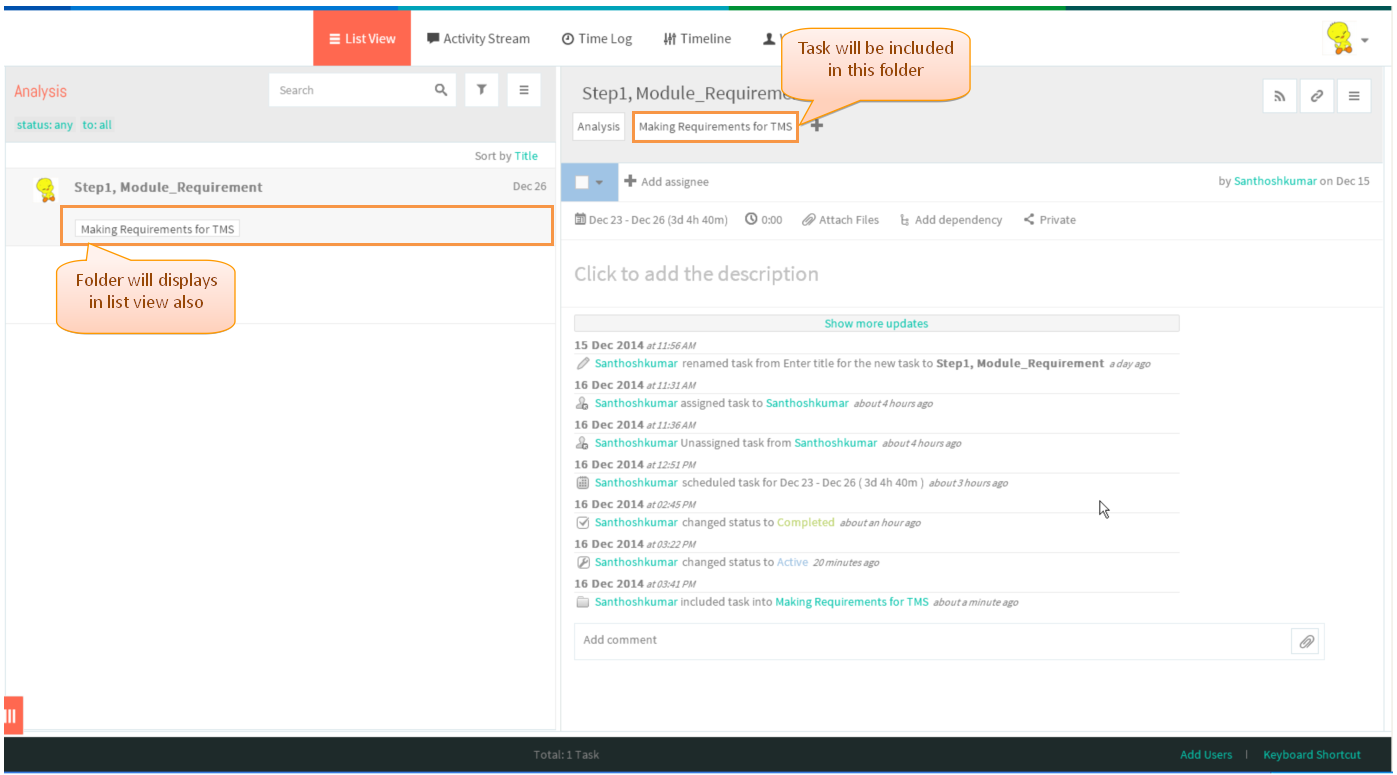
- Click on the folder title display under the list, the task will be included in that folder and Displays to other users if that folder is shared
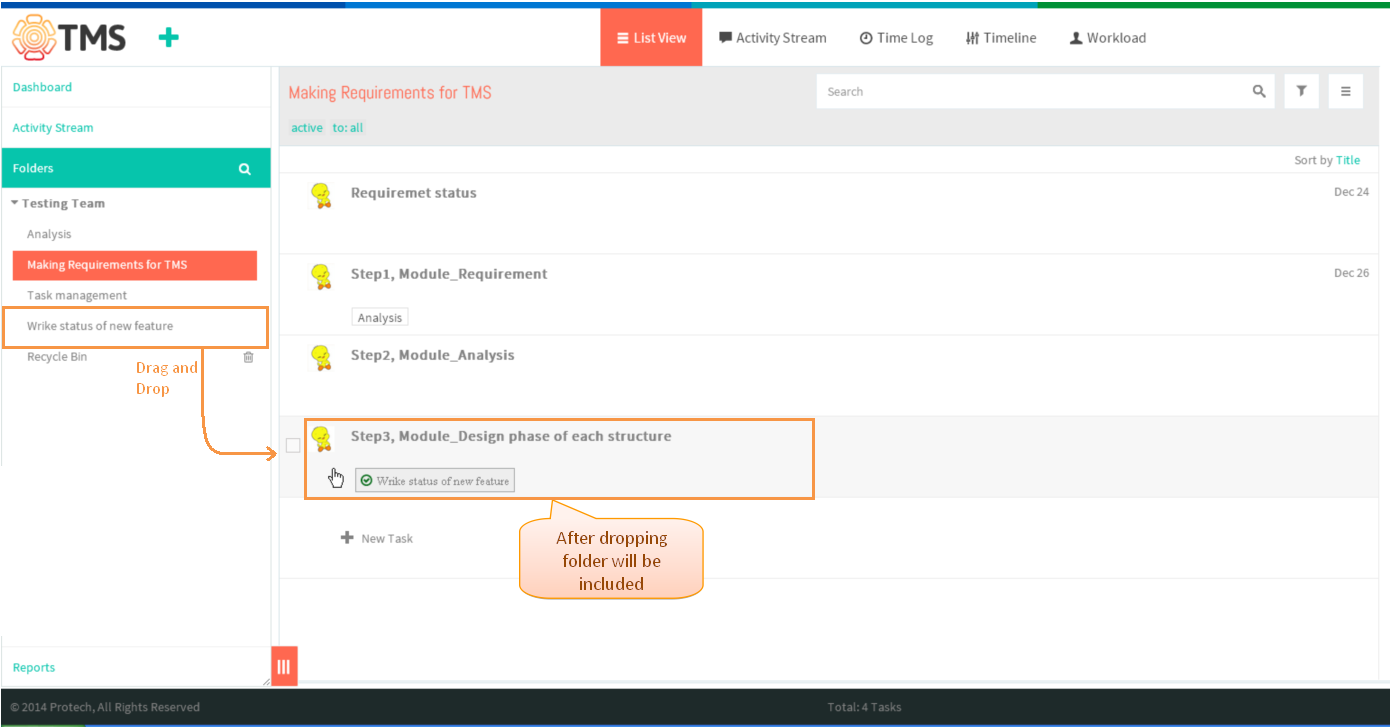
- Simply you can tag the folder by dragging the folder from left pane (Tree structure) into the task list view pane. To tag a multiple tasks, select all the task in list view by checking the boxes which is present near to
task title (when hovering the mouse displays the check box), then drag a folder tree onto a task list view
Tagging Tasks Into Folder Video
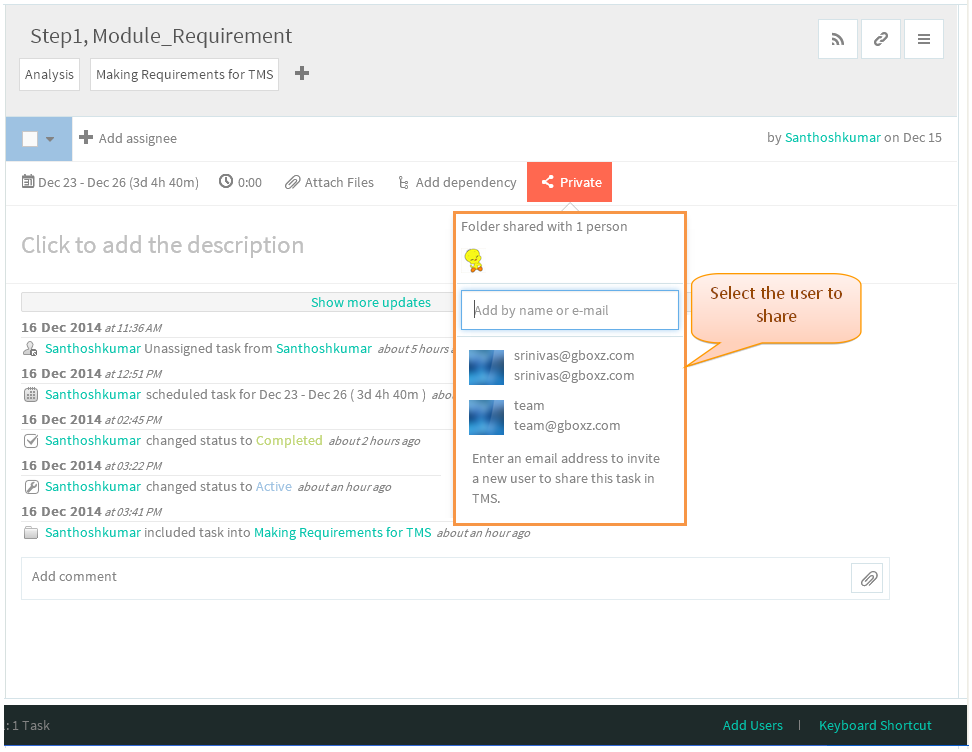
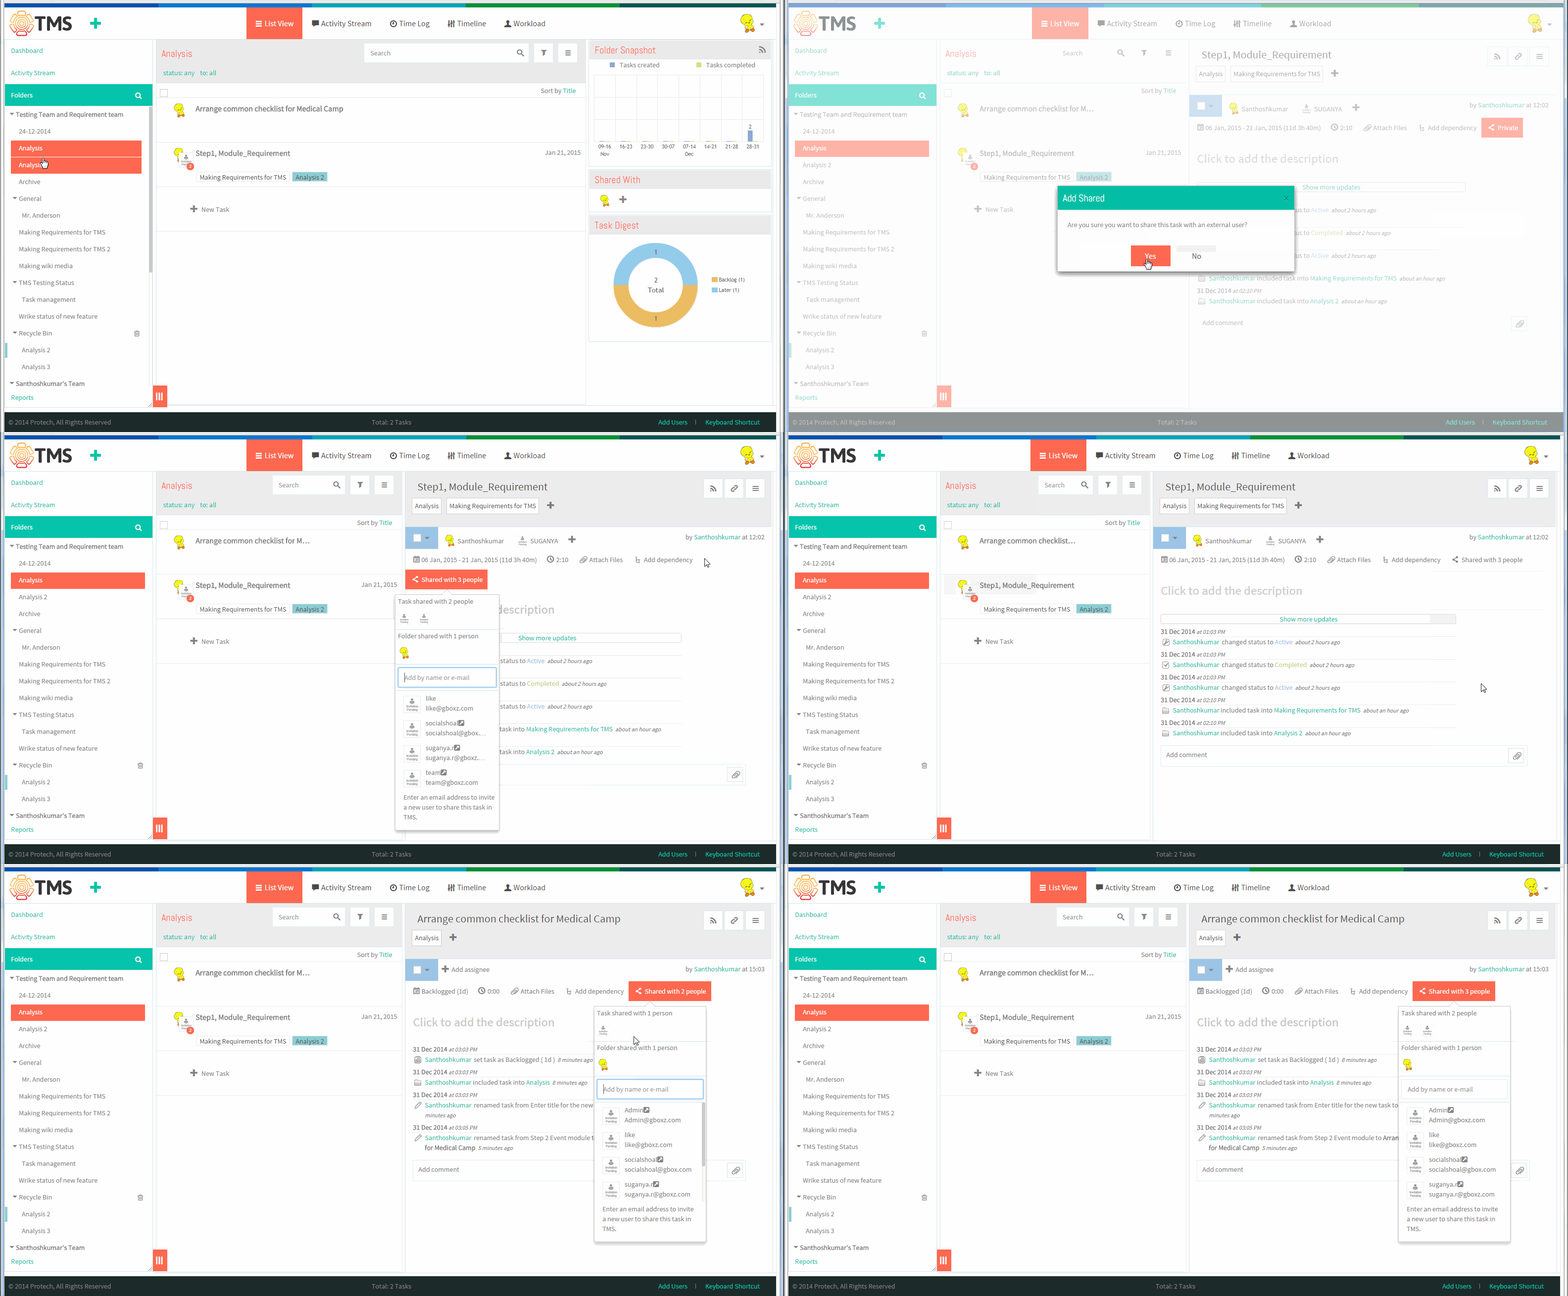
- By default task will will be shared to author, click on task in list view pane, task gets open in thrid pane
- Click on “Shared with N people”, Select the user from the list
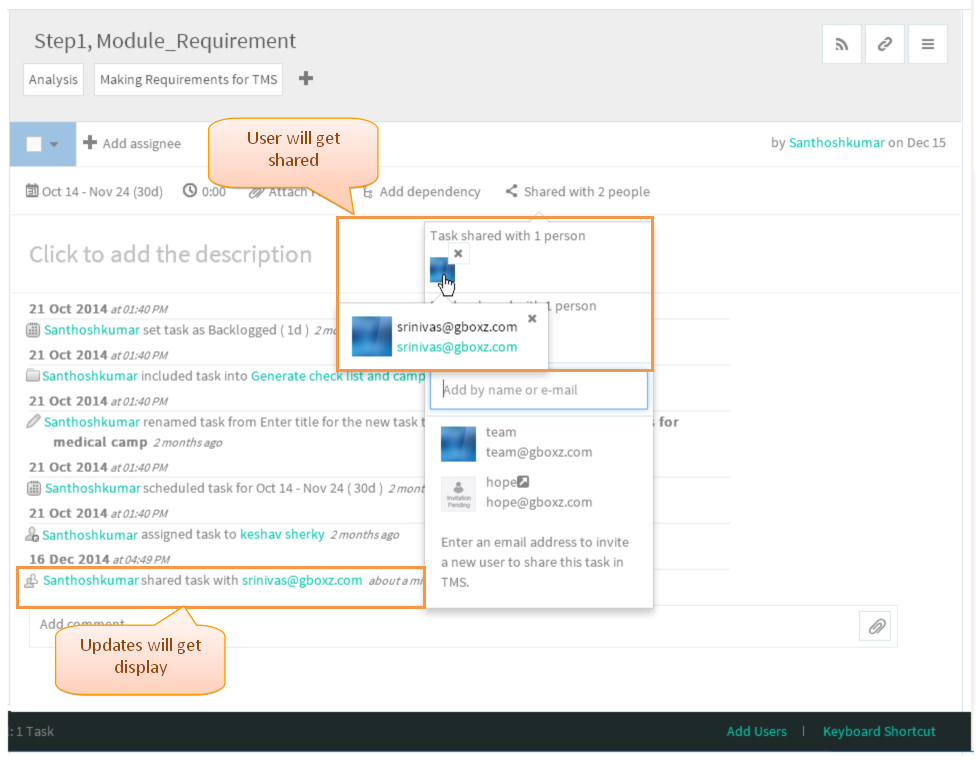
- Shared user will get display when we click on the "share with N people", Appropriate task will get display to shared user
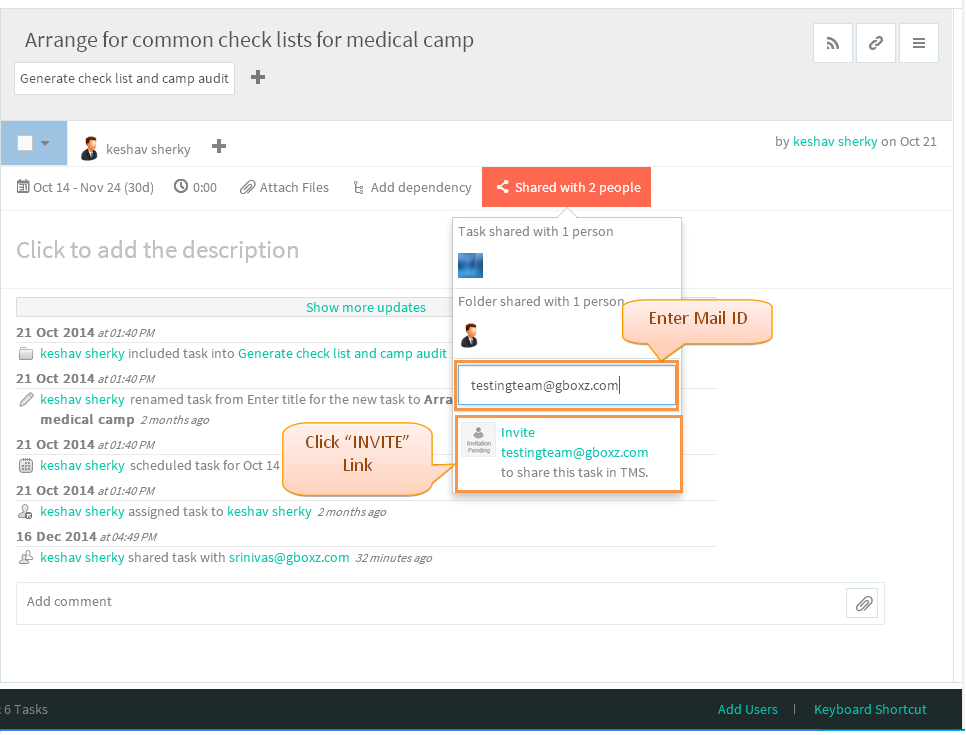
- If the user name is not present in the drop-down list, you can invite that person directly from sharing. enter the User mail id and then click on "Invite",
Appropriate user will get invitation mail, after accepting task will get display to the user
Task Sharing Video
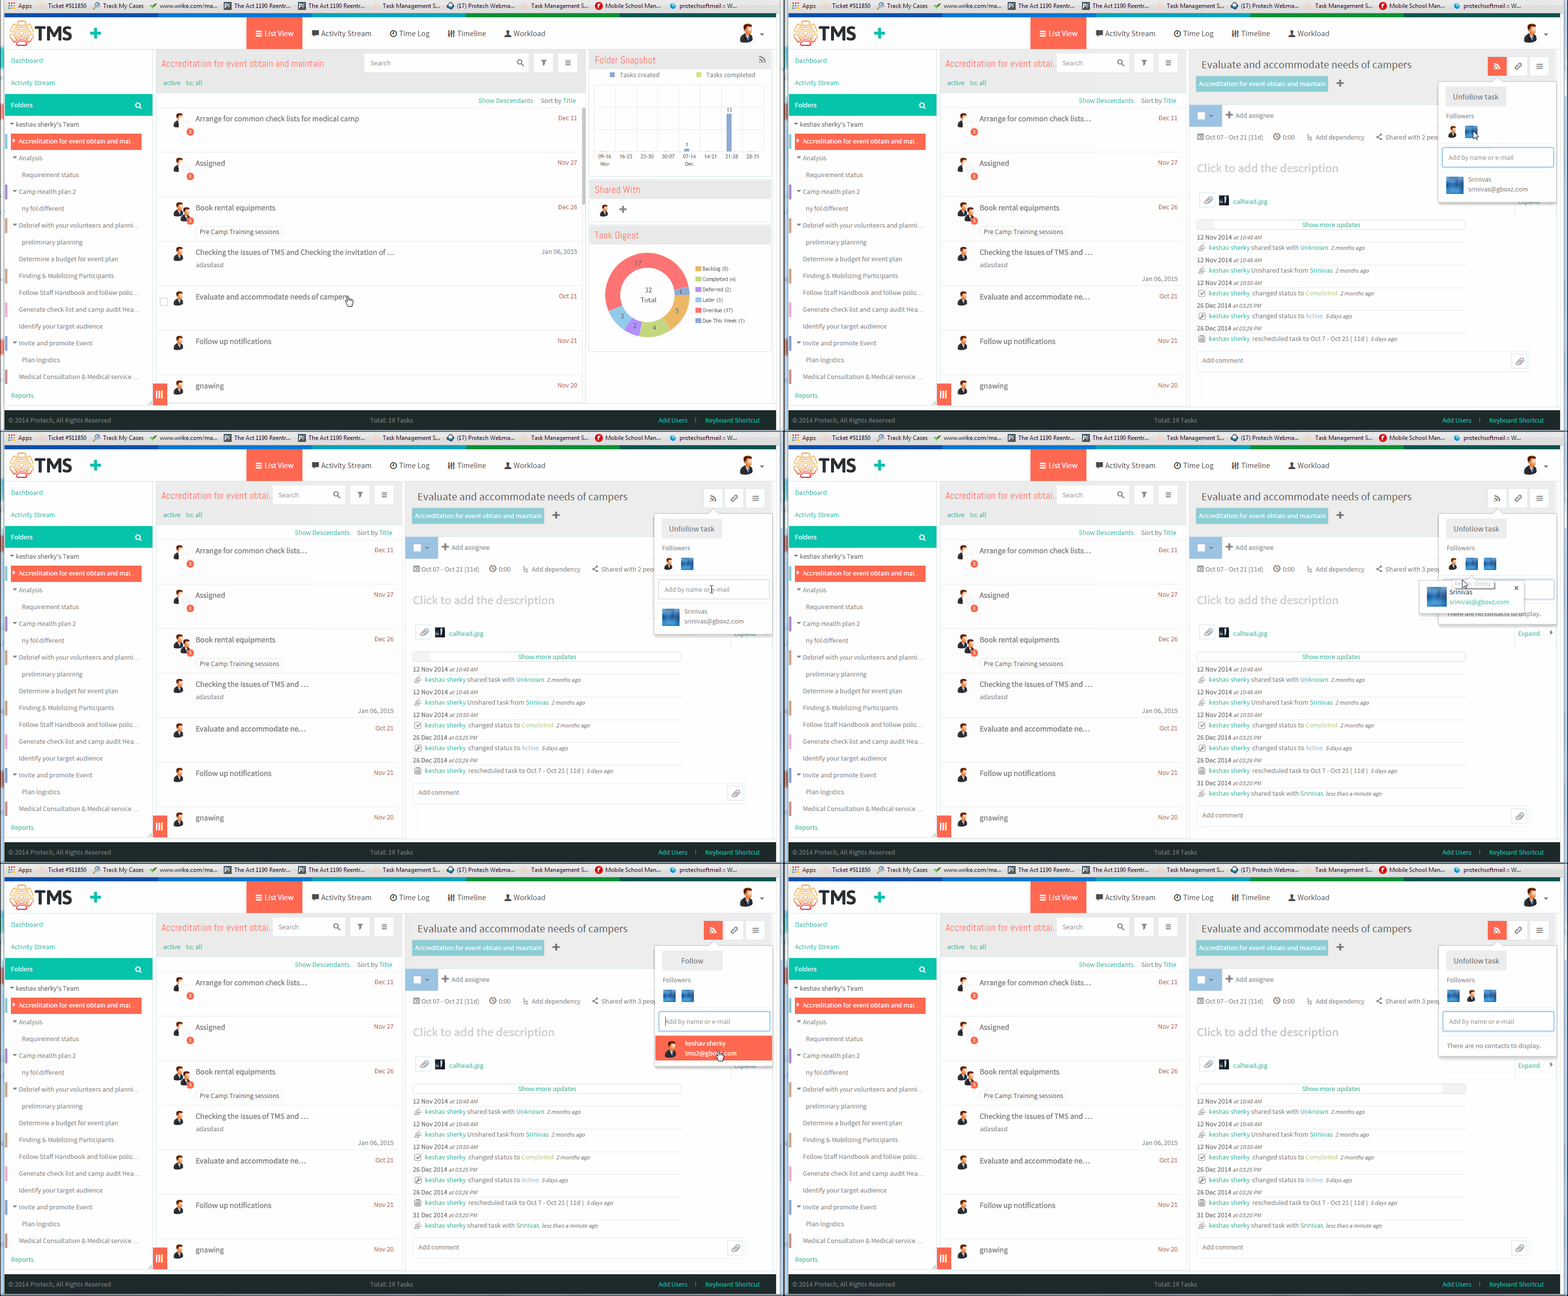
Follow a task
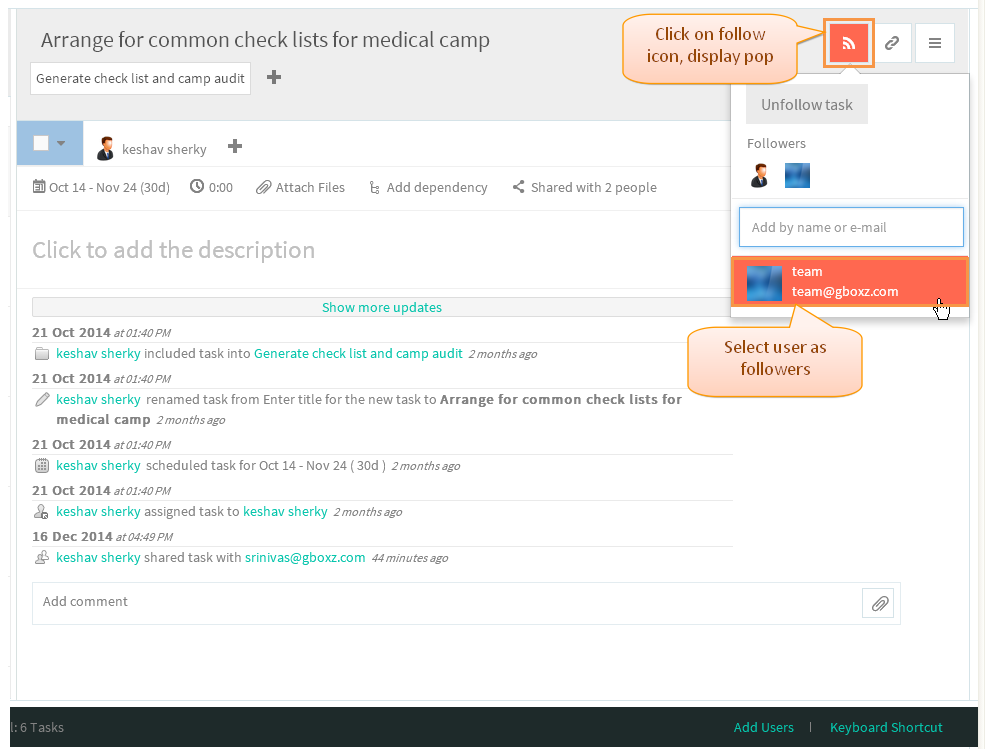
- Open the task, then click on the follow icon, select the user as followers
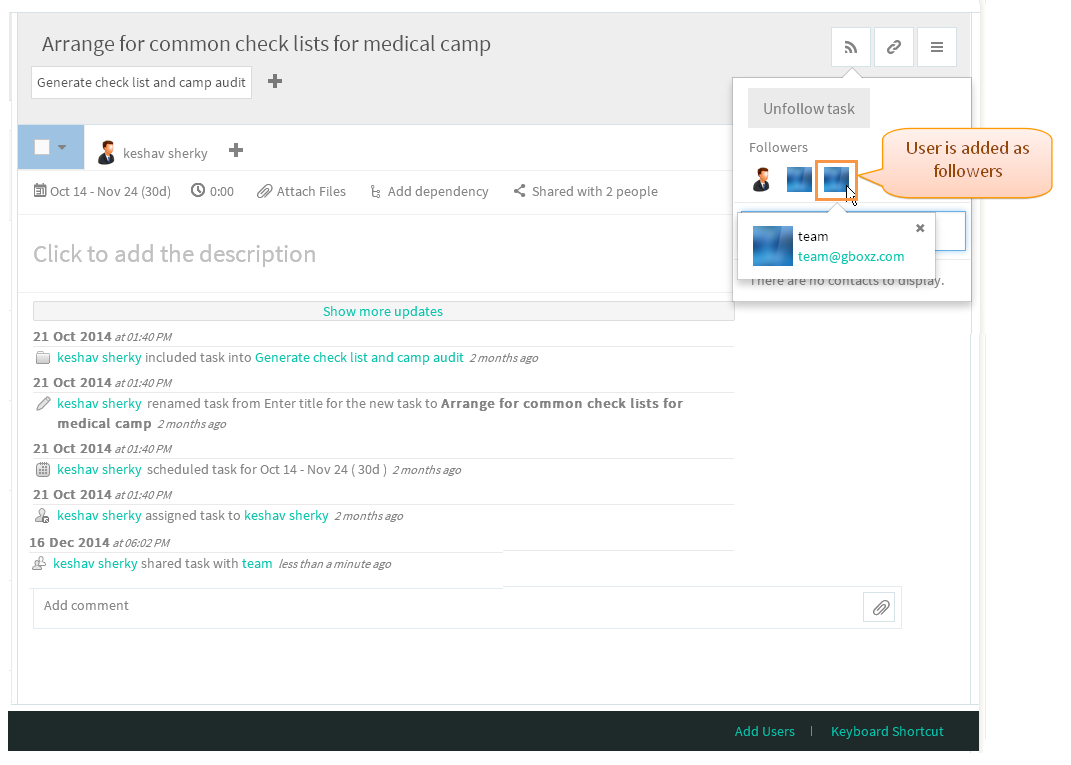
- Appropriate user will get added in share and followers
Follow Task Video
Cross-link tasks
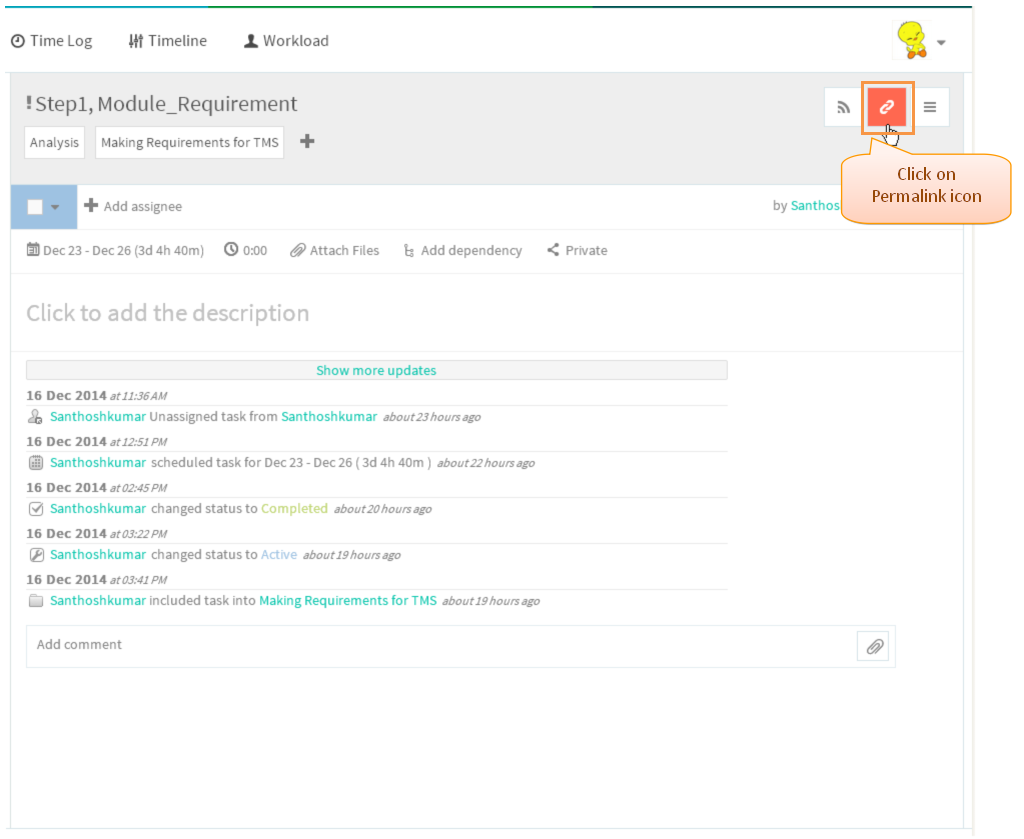
- Click on the task in list view
- Then Click on the “Permalink” icon.
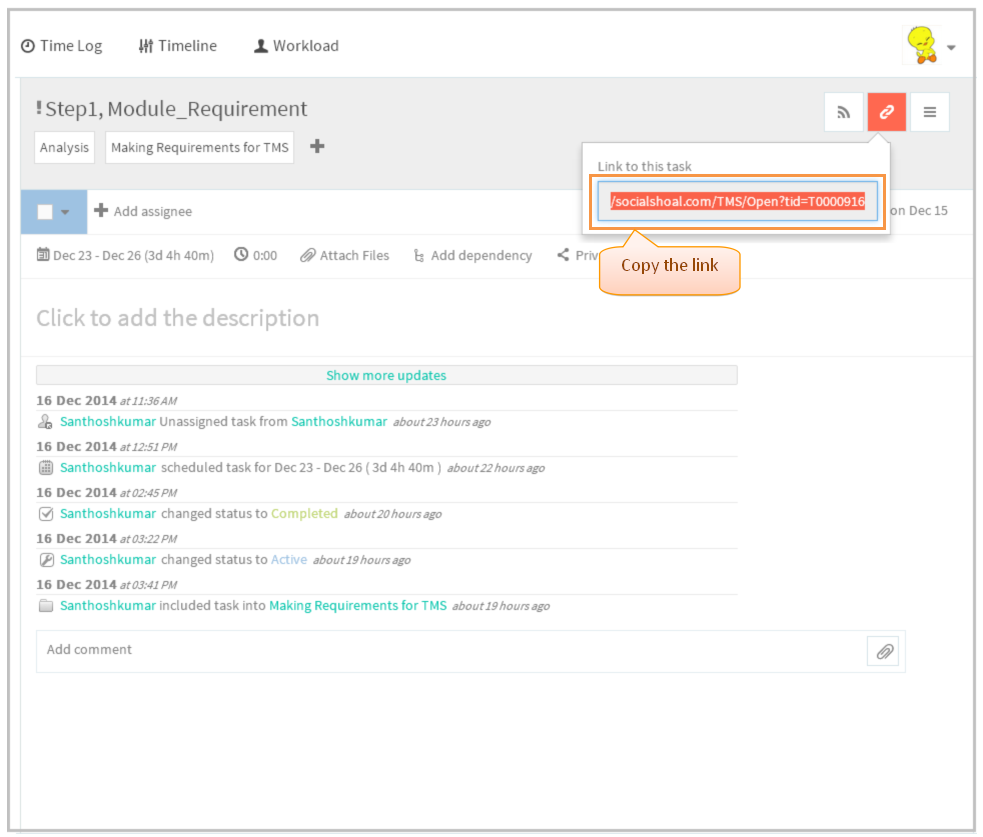
- The pop up displays the URL to copy the link. Now Copy the link
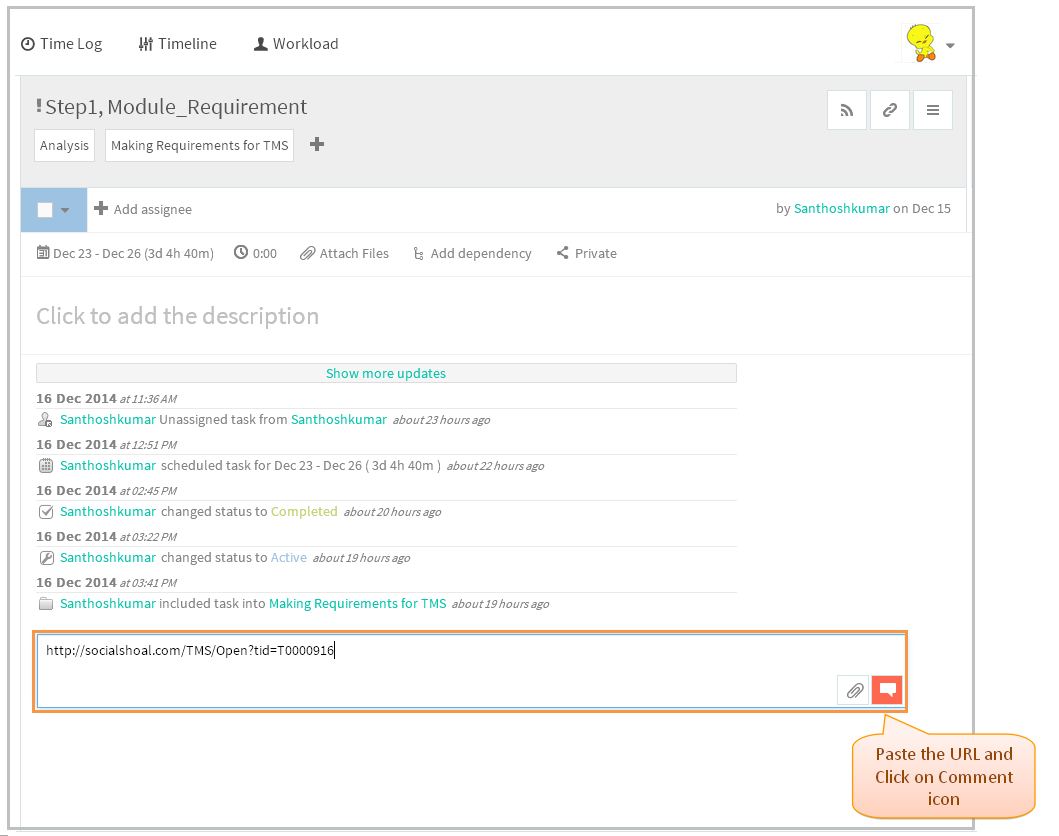
- You can insert the link in the description of other tasks or folders. Now paste the link in comment field then click on comment icon to post the comment
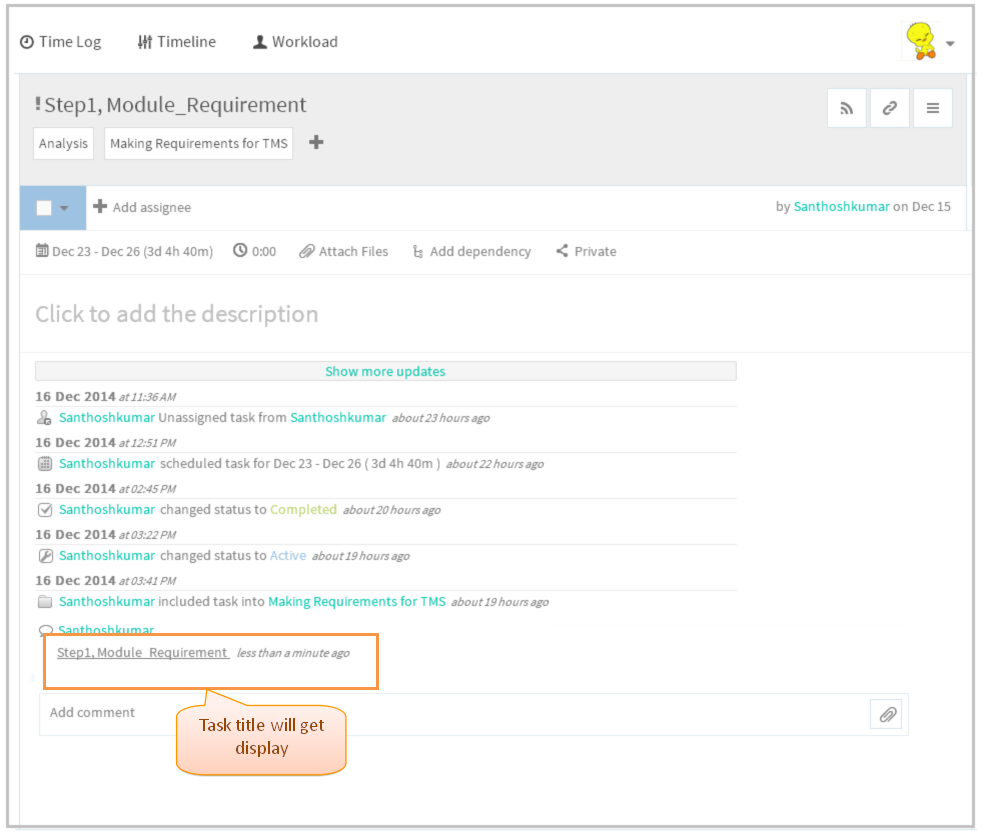
- After clicking comment icon, The link will be automatically converted into the underlined task title which is shown in below. On clicking the task
title will show the task page
Note: In TMS will display the link only. This is mock up screen shot which is shown below
Checklists
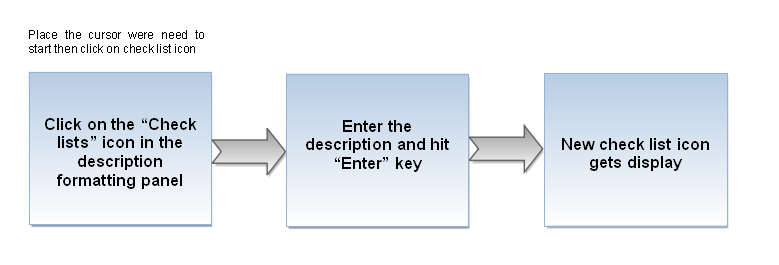
- Note: This option is not available in TMS, shown the mock up screen
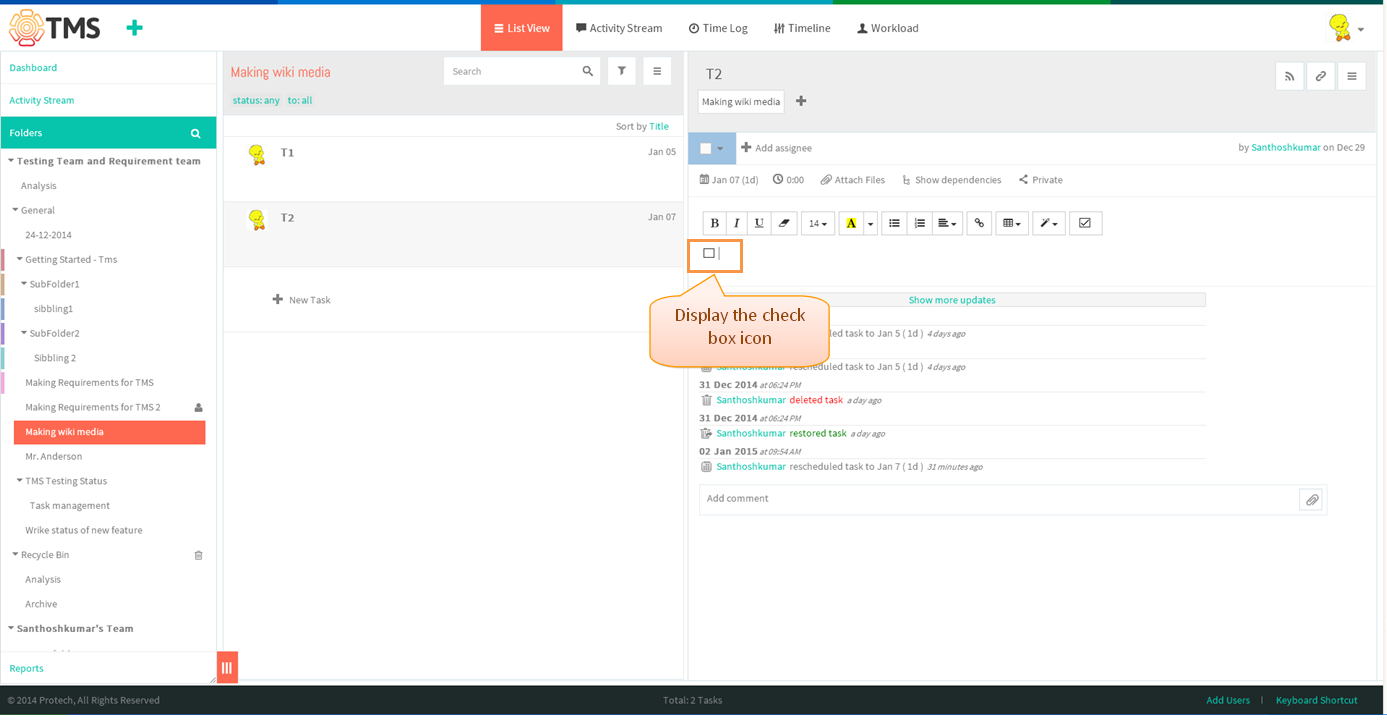
- Click on the checklist icon which is in formatting panel, check box will get display which is shown in below screen
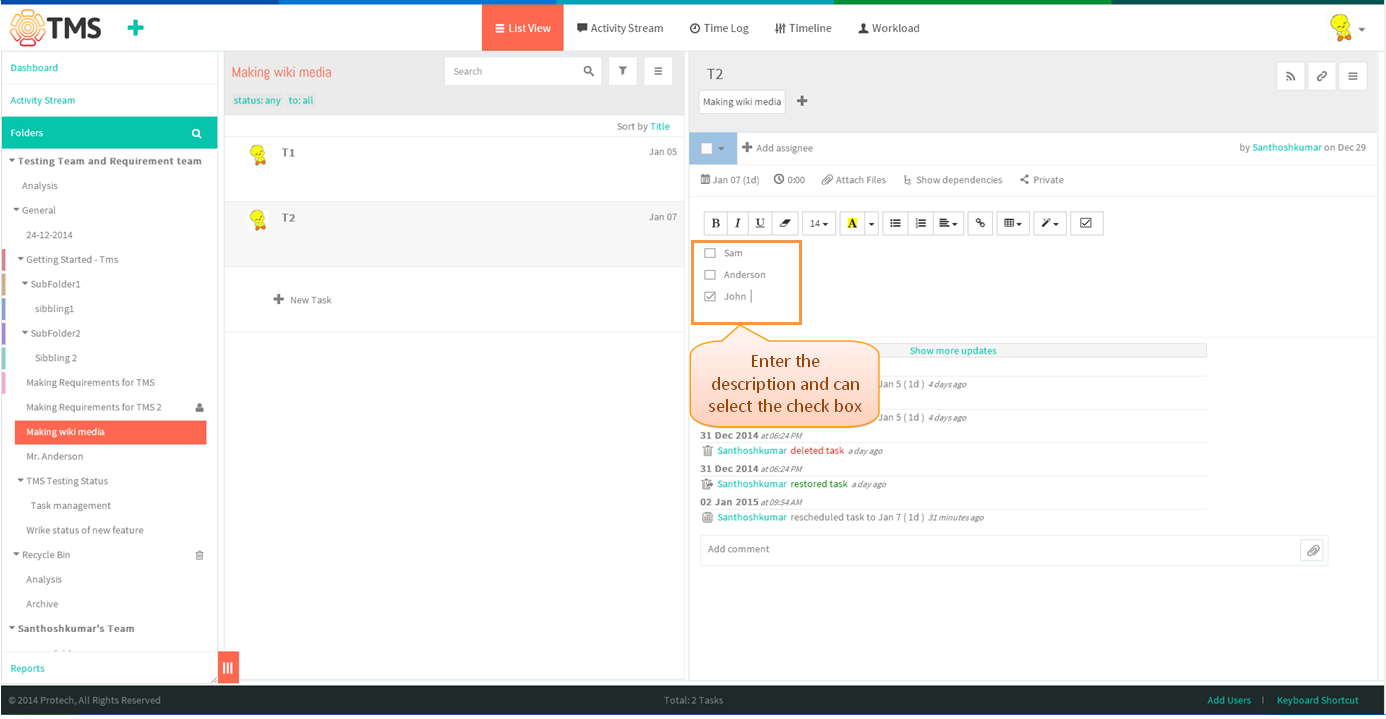
- Enter the descrition, then hit enter key for next check box and we can select the check box which is shown in below image
Print a task
- Click on the task in list view
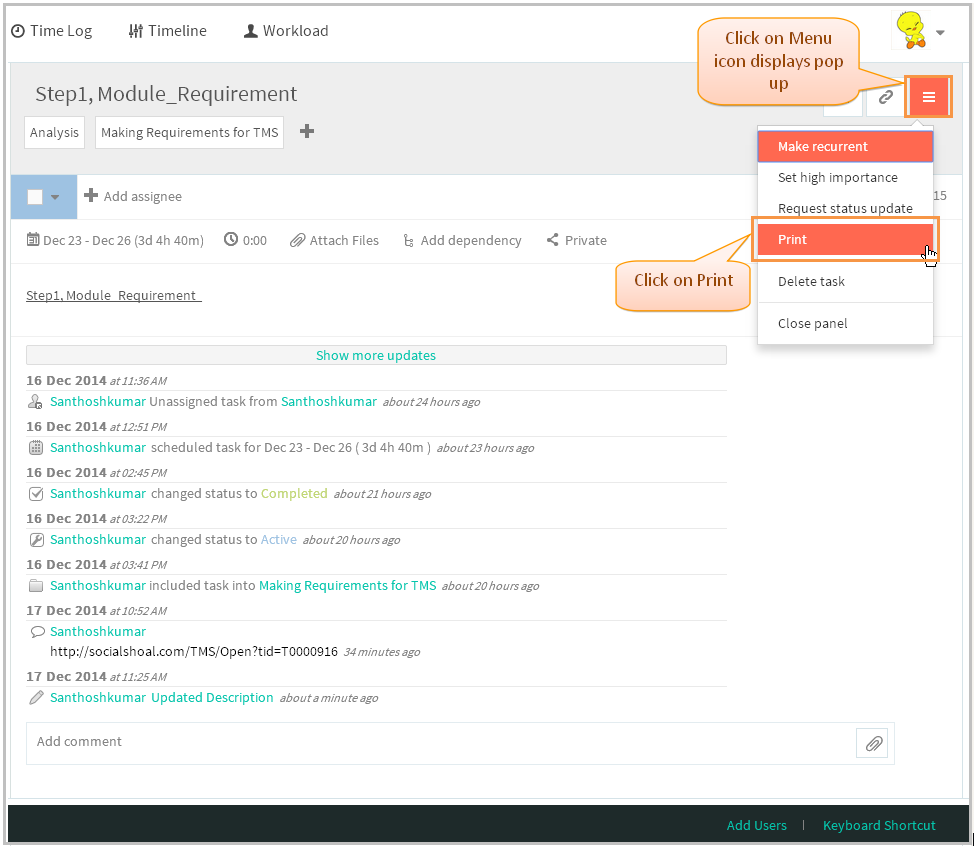
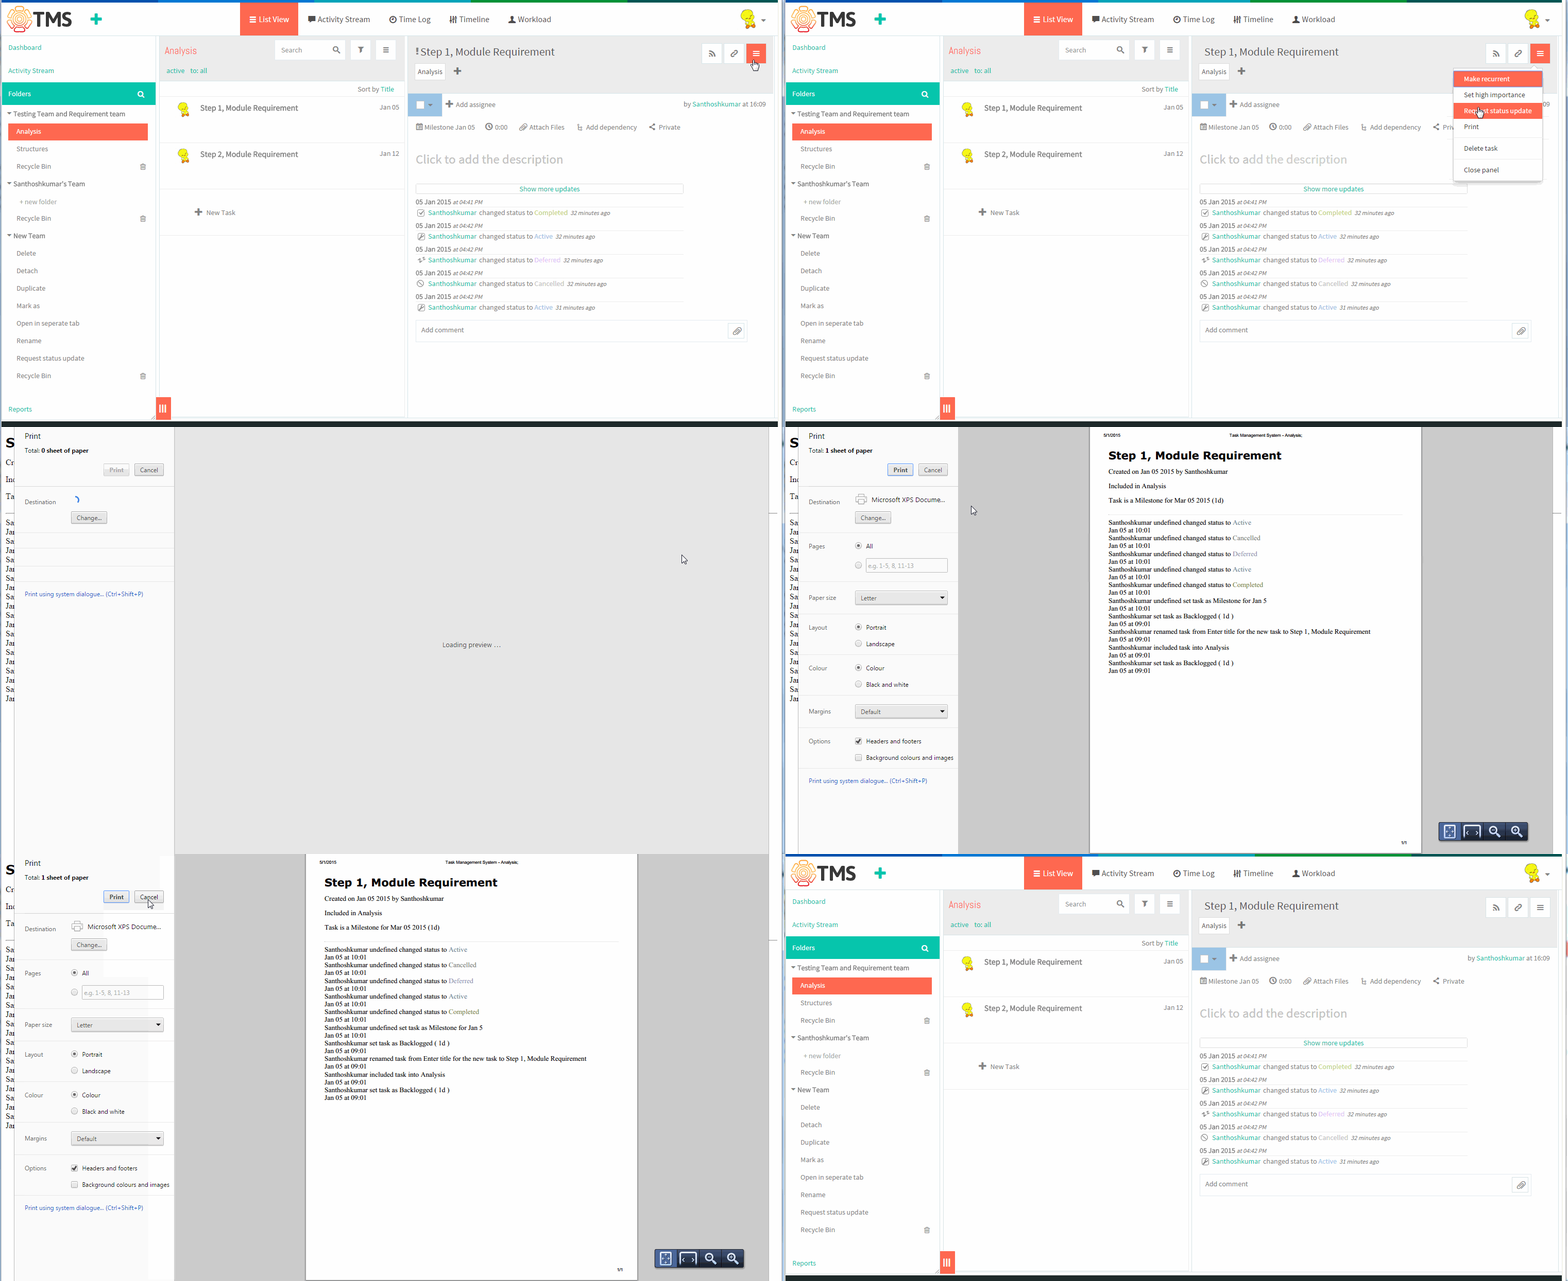
- Task pane gets open, Click on the “Menu” button in task pane. Then click on the Print option. A new browser tab will open
with the predefined print menu options
Print Task Video
Add dependencies to a task
- Click on the task in list view
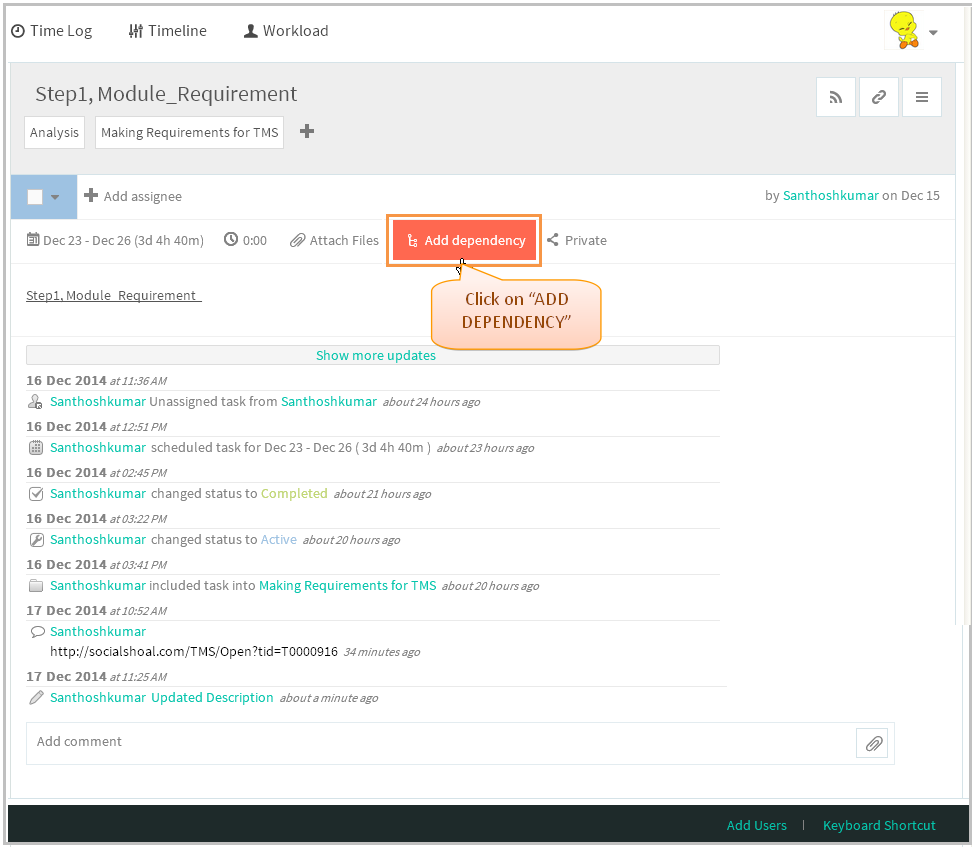
- Task pane gets open, To add dependencies to task, click on "Add dependency"
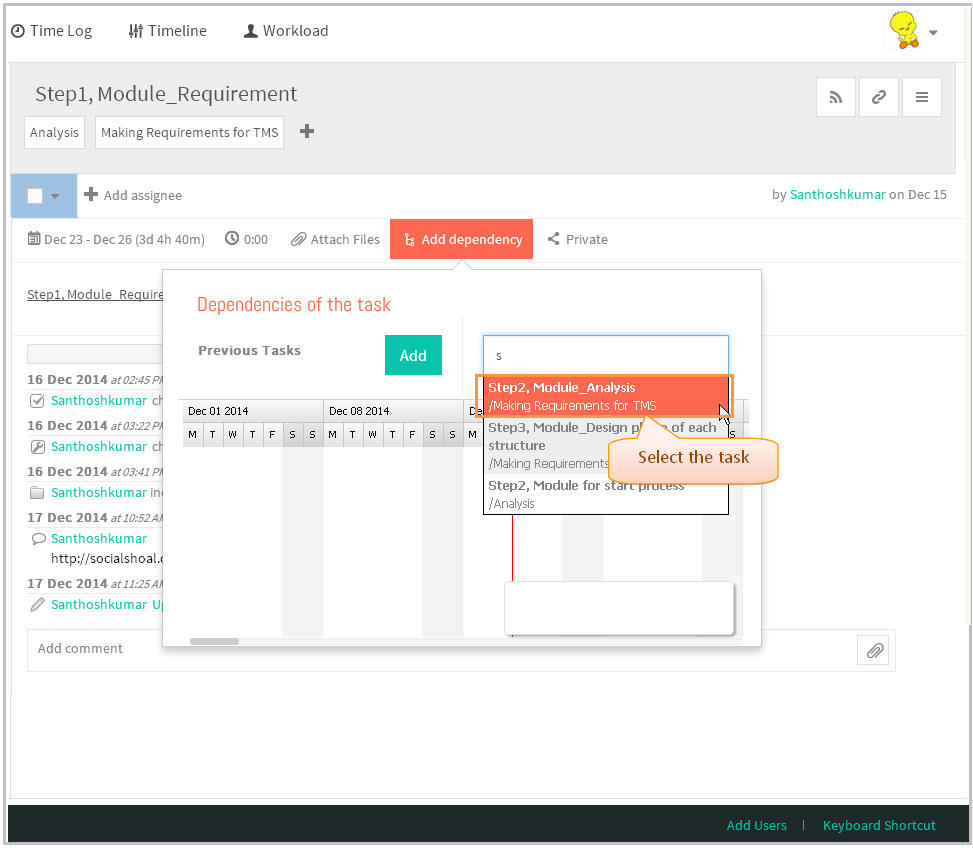
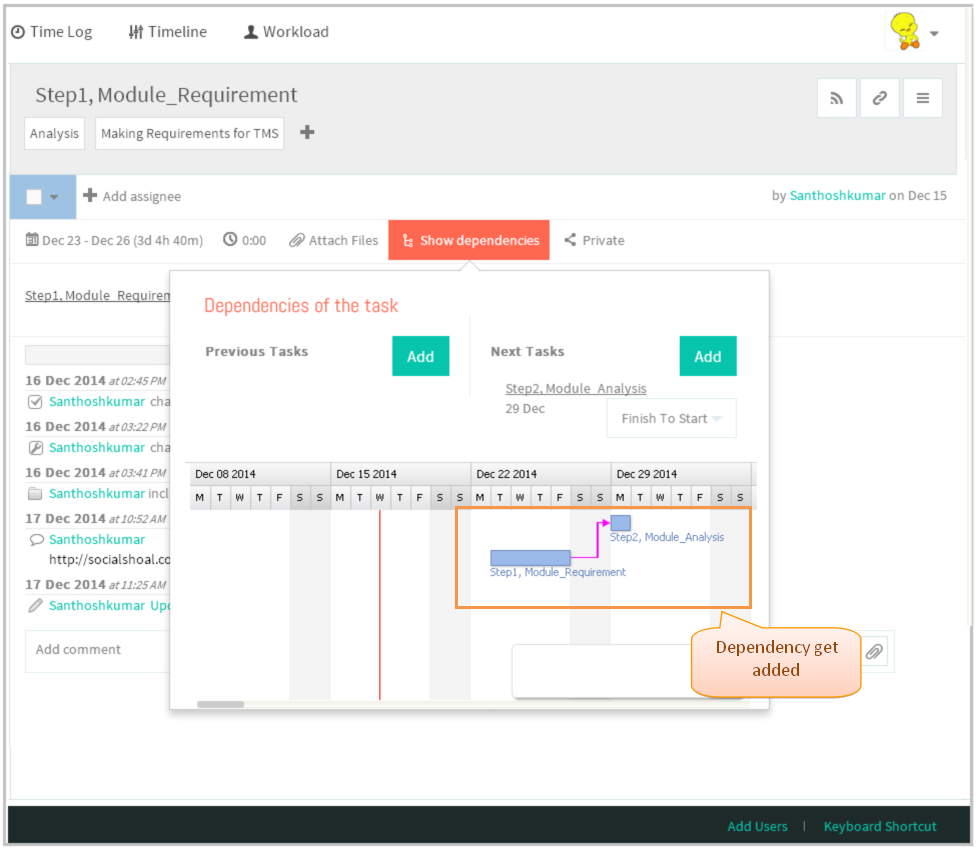
- We can add previous and next task as dependency, now we search for next task to add dependency click on add button then
enter the task name in search box(same for adding a previous task) and then click on the searched task to add. Dependency task will get added
- Dependency task will get added
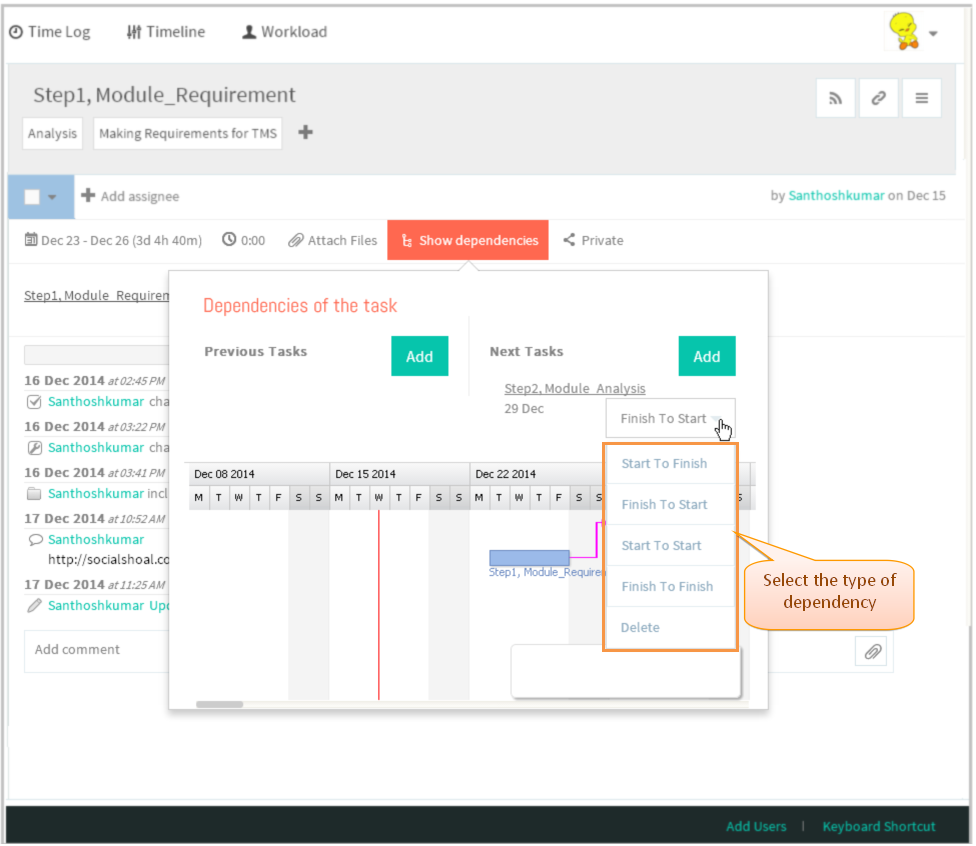
- Then we can choose the type of dependency. Also draw dependencies on the Timeline page


